• Skip to primary navigation
  • Skip to main content
  • Skip to primary sidebar

The Other Side of the Tortilla

  • HOME
  • ABOUT
    • CONTACT ME
    • FAQ
    • PRESS
    • PRIVACY POLICY
    • MEDIA KIT
    • ADVERTISE
  • RESOURCES
    • BOOKS
    • SHOP
    • INGREDIENTS
    • KITCHEN TOOLS
    • Thanksgiving
    • Mexican Christmas Traditions
  • RECIPES

How To

How to choose a ripe avocado

44 · Feb 4, 2018 · Leave a Comment

If you’ve ever struggled with finding a ripe avocado in the grocery store, here are my foolproof tips to make sure you never buy unripe avocados by mistake again.

A guide on how to choose ripe avocados

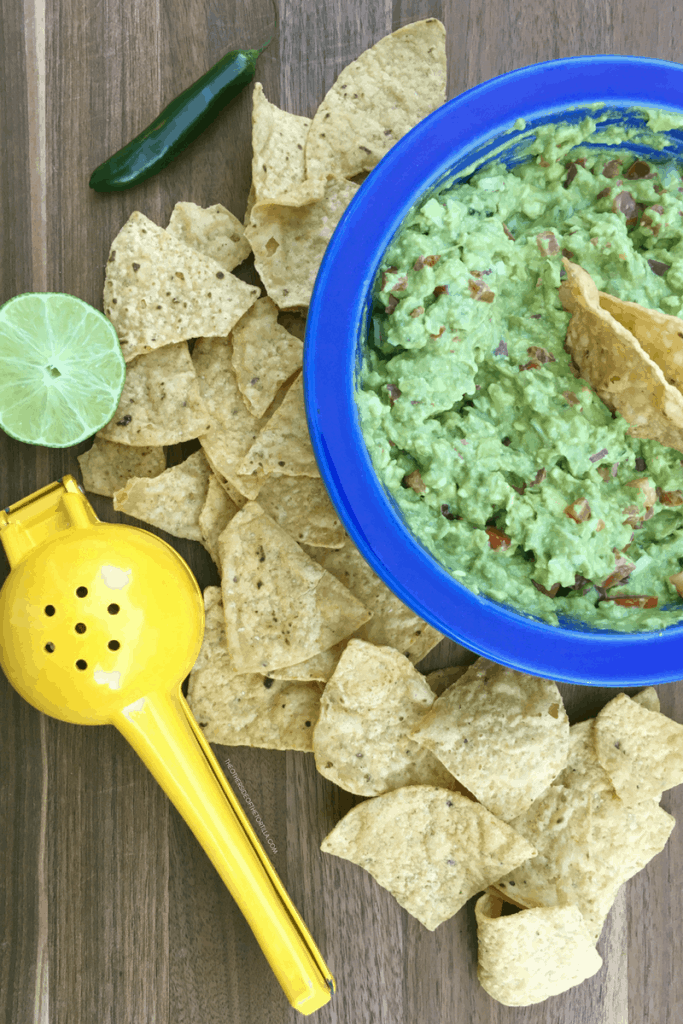
Avocado is a very versatile ingredient in Mexican cuisine. And although most people think of avocado just as a savory ingredient, you can use it for sweet recipes, too. Aside from typical recipes like guacamole and salsa verde with avocado, this fruit is also great for making avocado paletas, avocado fudge pops, and avocado chocolate pudding.

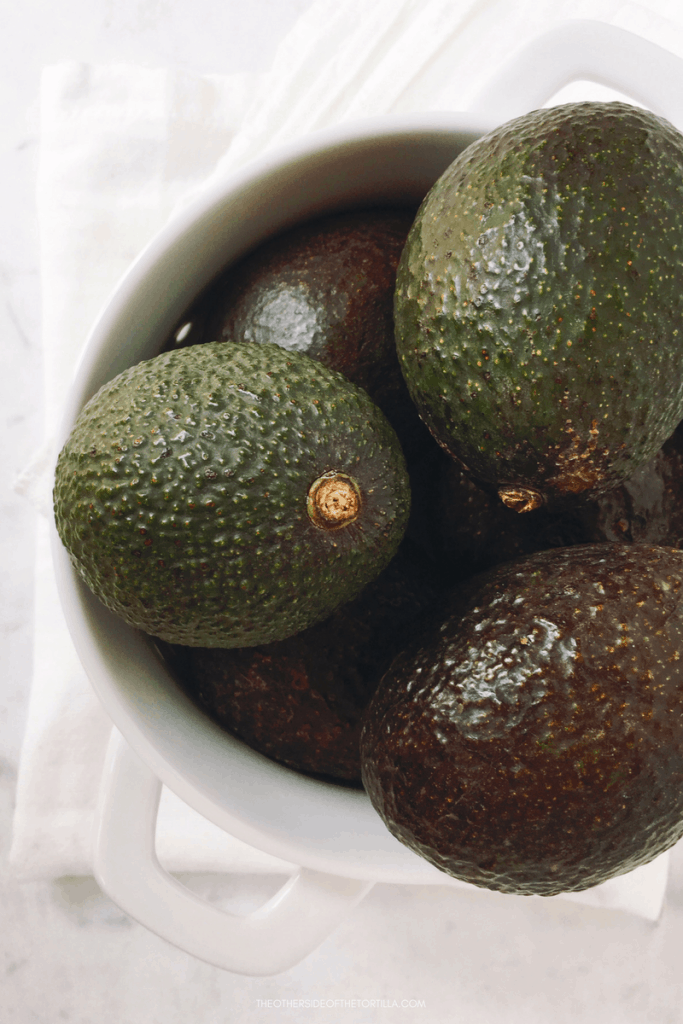
With so many potential uses, you’ll want to ensure you always have avocados on hand. But when it comes to choosing a ripe Haas avocado, there are a few cardinal rules to follow.

DO

  • Evaluate the avocado’s skin color and texture, and remove the stem to determine ripeness.

DON’T

  • Squeeze the avocado. There’s a difference between using your fingers to gently feel if the skin gives—indicating softness—and squeezing it, which can damage the flesh inside, and in some cases, break the outer skin.
  • Put avocado in the refrigerator before they’re ripened.

…

Read More

Guides, How To, Mexican Ingredients avocado

HOW TO: Make molletes

26 · Sep 17, 2012 · 19 Comments

Great for a quick, easy meal or a snack made from leftovers, molletes are very popular in Mexico. You can typically find them at any coffee shop and in many casual restaurants around the country as well. They can be eaten for any meal and you probably have all of the ingredients without knowing it!

A few notes: Day old bread is best, but you can use fresh bread just fine if you toast it well. There aren’t really exact proportions here in this guide. I typically make refried beans at the beginning of each week and just use them until they’re gone. If you don’t do the same, a small can of refried beans will do just fine here, and you’ll still have some left over. Here, I’ve used pinto beans. You can also use frijoles bayos refritos (a cousin in taste and texture to the pinto bean) or refried black beans. You can also add as much or as little cheese as you’d like; the point is that you cover the beans.

WHAT YOU’LL NEED:

  • For each serving  of two molletes, you’ll need one bolillo roll. If you don’t have those, you can substitute with a loaf of soft French bread cut into sections.
  • A little bit of butter or margarine
  • A few tablespoons of refried beans (frijoles refritos) for each piece of bread
  • Shredded cheese (I recommend: Chihuahua, Oaxaca, Monterrey Jack. Note: In Mexico, I prefer what they call manchego, which is not the same as Spanish manchego, but they don’t sell Mexican manchego in the U.S. to my knowledge.)
  • Salsa mexicana (here’s my recipe for 2 servings, which can be doubled or tripled for however many you’re feeding)

Keep reading for step-by-step photos to help you assemble your molletes.…

Read More

How To, MexMonday, Recipe, Staple Recipes, Vegetarian/Vegetariano bolillo rolls, Chihuahua cheese, frijoles refritos, molletes, refried beans, salsa mexicana

How to keep your guacamole fresh and green

372 · Jun 1, 2012 · 13 Comments

There’s an easy way to keep guacamole fresh and green—without using the pit, adding too much salt, covering it with water, milk or any of the other “tricks” you might find with a quick Google search. If you’ve ever woofed down a whole bowl of guacamole just to keep it from going brown in the refrigerator, your life is about to be changed. I promise this tip is the green-guacamole-for-days jackpot!

Tips and recipe for making the best guacamole, via theothersideofthetortilla.com

My family is always asking me to make guacamole. Always. I make it for parties and barbecues, when people casually drop by and even when somebody calls and asks, “if I drop off the ingredients, will you make it for me?” My dad is by far the biggest culprit of the weekend phone call requesting a drive-by guacamole drop-off. I used to tease him that if it weren’t for the guacamole, he wouldn’t stop by as often.

But with a jam-packed schedule and some travel time occasionally involved on one or both ends to get the ingredients and then deliver the goods to their final destination, it’s not always easy to make the guacamole and deliver and serve it right away. Yet, nobody would ever know that it’s usually been in the refrigerator for a full day beforehand because my guacamole always arrives perfectly green and fresh as if I just made it.

I’m going to reveal a method and kitchen tip that is going to turn you into a guacamole hero. But be warned; I can’t be held responsible if friends and family start calling to drop off ingredients because you earn a reputation for having the greenest guacamole they’ve ever seen!

Need a basic guacamole recipe? I’ve got you covered. Also check out my fruity guacamole recipe with pineapple and pomegranate seeds. You might also like my mango guacamole recipe.


The BEST way to keep guacamole fresh and green for days via theothersideofthetortilla.com


HOW TO KEEP YOUR GUACAMOLE FRESH AND GREEN

STEP 1: Choose avocados that are barely ripe. They should give only very slightly when you press the skin. Prep all the ingredients (onion, chile, lime, tomato, cilantro, etc.) before you cut the avocados open. The flesh should not be too creamy/soft when you open them and you shouldn’t find brown or dark spots on the flesh at all.

…

Read More

How To aguacate, avocado, guacamole, kitchen tip

Salsa de tres chiles

1 · Jul 12, 2011 · 4 Comments

In case you missed it last week… check out our salsa de tres chiles on the Kenmore Genius Blog – the ultimate fresh, homemade dip for your tortilla chip! Warning: you may never be able to eat crappy restaurant “salsa” ever again after tasting this stuff. You know what I’m talking about – that runny, watery, often bland mess of tomatoes, onion and jalapeños they serve at chain restaurants. You’ll have to visit the Genius Blog for the full recipe with instructions, but here’s a sneak peek of the video:

[youtube]http://www.youtube.com/watch?v=qjYHU9woZ1s[/youtube]

  • Give this post a Facebook “Like” or a +1 on Google+ if you pledge to never eat bad salsa again!
Disclosure: I am compensated for my posts on the Genius Blog and provided with Kenmore small appliances to test but all my recipes and opinions, about the appliances and otherwise, are my own.

Chiles, How To, Kenmore Genius Blog, Recipe, Salsa, Sponsored, Video ajo, cilantro, food processor, garlic, jitomate, Kenmore, Kenmore Genius Blog, Salsa, tomatoes, tortilla chips, totopos

Paletas de mango con chile

7 · Jun 24, 2011 · 1 Comment

I wrote about my love for paletas and shared a recipe for paletas de mango con chile on the Kenmore Genius Blog recently. These are similar to mangonadas, but those usually include chamoy as an ingredient, and this recipe doesn’t.

Hop over there to check out the post with some additional notes on the ingredients. Enjoy the yummy video!

[youtube]http://www.youtube.com/watch?v=_MdGPkxkE2Y[/youtube]

Print
Paletas de mango con chile

Paletas de mango con chile

Ingredients

  • 4 manila mangoes
  • juice of 4 limes
  • 4 tsp chile powder (or more to taste)
  • 1/2 cup water
  • 1/4 cup granulated cane sugar (I like Zulka brand)
  • zest of 2 limes

Instructions

  1. In a sauce pan, bring the water, sugar and lime zest to a boil, then reduce heat to a simmer. Stir until sugar is dissolved. Simmer for about 5 minutes to infuse the flavor of the lime zest and then remove from heat and let come to room temperature.
  2. Peel the mangoes and remove all the flesh. When you get close to the pit, you can just scrape it in a downward motion away from you to get the last bits off.
  3. Put the mango flesh (which should be about 2.5 cups) into the blender with the lime juice, sugar syrup and chile powder.
  4. Pulse on low for 10-15 seconds so that you get a puree that has some small mango chunks in it.
  5. Pour evenly into popsicle molds, making sure not to fill them all the way to the top; the popsicles will expand a little when they freeze, so leave a little room so they don't spill. Place them on an even surface in the freezer for at least 12 hours (or longer if you use bigger molds).
  6. Once they’re frozen through, run the bottom of the mold under warm water just long enough to loosen them from the mold.
3.1
https://theothersideofthetortilla.com/2011/06/paletas-de-mango-con-chile/
©2009-2015 theothersideofthetortilla.com

Disclosure: I am compensated for my posts on the Genius Blog and provided with Kenmore small appliances to test but all my recipes and opinions, about the appliances and otherwise, are my own.

Algo dulce, Dessert, How To, Kenmore Genius Blog, Recipe, Sponsored, Video chile, chile para naranja, Kenmore, Kenmore Genius Blog, lime, limón, mango, paletas

MILANESAS

10 · Feb 21, 2011 · 4 Comments

[youtube]http://www.youtube.com/watch?v=l3MpWGncssw[/youtube]

Milanesas are a favorite in our house in part because they’re so easy to make. They’re great with beef, pork or chicken cutlets and the rest of the recipe never changes! Whenever I’m in a rut and not sure what to make for dinner and am short on time, this is usually my go-to recipe. The best part is that you can prepare the meat and dredge it the day before and just refrigerate overnight so all you have to do is cook them. Just be sure to separate each cutlet so they don’t get stuck together and store in an airtight container.

Served with lime wedges and a little salsa to garnish, our favorite way to eat milanesas is of course, as a taco. José also likes milanesas de puerco served with papas fritas. I like milanesas de pollo with rajas de chile poblano y cebolla. Really, there are lots of ways you can serve them, so be creative.

I typically use a little oil as possible – not in an attempt to be healthier because fried foods just aren’t healthy – but to keep the breaded cutlets as light as possible. If you use too much oil, it’s possible for them to get heavy and greasy. With less oil they stay lighter and, dare I say, a little less unhealthy because they’re not soaked in grease….

Read More

How To, Meat, Poultry, Recipe, Video

Papas gratinadas

20 · Feb 7, 2011 · 16 Comments

To me, wintertime means lots of comfort foods. And pardon the pun, but during the blizzard we had here last week, I was cooking up a storm while I was cooped up inside for three whole days. One of my favorite comfort foods is papas gratinadas, a Mexican version of potatoes au gratin.

I love it so much, in fact, that while I’m writing this, I’m thinking about going to the store for more potatoes so I can make another batch. The last two times I’ve made this dish, it disappeared in less than 24 hours. And my friend Silvia over at Mamá Latina Tips has been asking me to post this recipe for several weeks since I told her I made it because her mom used to make papas gratinadas for her and it’s one of her favorites, too.

These are a great side dish (or, um…an afternoon snack) when you need hearty, warm food to keep you full and fueled to fight the cold outside. Here’s a quick video tutorial on how to make this recipe.

[youtube]http://www.youtube.com/watch?v=3bseuBjSf_Q[/youtube]

…

Read More

How To, Recipe, side dishes, Staple Recipes, Vegetarian/Vegetariano, Video "serrano chile", cebolla, Chihuahua cheese, chile serrano, crema, crema de leche espesa, crema Mexicana, papas, potatoes, queso Chihuahua

Crock-Pot frijoles de la olla

183 · Jan 31, 2011 · 6 Comments

Frijoles de la olla are a staple in Central Mexican cuisine. Traditionally, they’re cooked in a clay pot, but this version is adapted for cooking in a slow-cooker or Crock-Pot.

There are three types of beans you typically see in frijoles de la olla recipes: frijoles bayos, flor de mayo or pinto beans. Frijoles de la olla made with those type of beans are most common in Central Mexico. All three varieties have a pinkish hue, with pinto beans being the lightest in color among them. These are also the same kind of beans I use for making frijoles charros.

While individual recipes for frijoles de la olla may vary, they will also often include common ingredients such as onion, garlic, manteca de cerdo (pork lard), salt and hierbas de olor (herbs such as epazote or cilantro that are cooked in with the beans for flavor). Other variations may include different spices such as cumin or bay leaves.

In Eastern Mexican states such as Veracruz and others bordering the Gulf of Mexico, as well as the South and Southeast states of the country such as Oaxaca, black beans are preferred over bayo, flor de mayo or pinto varieties. Accompaniments may also vary by region to include a fresh squeeze of lime juice, diced onion, chile serrano, chopped cilantro or crumbled fresh cheese.

Cooking tips for frijoles de la olla

To prep this dish the night before, add everything to the crock-pot except the liquids, pork neck bones and salt. The next day, add the liquid and pork neck bones and turn on high.

If you’re planning to let this cook all day while you’re not home, use a slow-cooker that has a timer that will turn the heat off or to a very low “keep warm” setting after the cooking time. You can then add the salt, reheat them for 30-60 minutes in the slow-cooker and enjoy!

If you don’t have a guajillo chile at home but you have other dried chiles, any other dried red chile you like and have on hand is an acceptable substitute. Just be sure to portion based on the heat factor! Or you can leave the chile out altogether if you prefer.

For those who like their beans with a thicker stew-like consistency instead of broth, some cooks mash or blend a portion of the beans and then re-add to the pot as the broth cooks down.

To make this dish vegetarian-friendly, leave out the pork neck bones and use vegetable broth instead of chicken broth.

This recipe will give you plenty of leftovers, and it’s great as a snack, a side dish, or even a main dish with some garnishes and mix-ins.

Print
clock clock iconcutlery cutlery iconflag flag iconfolder folder iconinstagram instagram iconpinterest pinterest iconfacebook facebook iconprint print iconsquares squares iconheart heart iconheart solid heart solid icon
pinto beans

Crock-Pot frijoles de la olla

★★★★ 4 from 2 reviews
  • Author: Maura Wall Hernandez
  • Prep Time: 15 minutes
  • Cook Time: 6 hours
  • Total Time: 6 hours, 15 minutes
  • Yield: 10 servings 1x
  • Method: Slow-cooker
  • Cuisine: Mexican
Print Recipe
Pin Recipe

Description

Frijoles de la olla are a staple in Mexican cuisine. Traditionally, they’re cooked in a clay pot over a fire or on the stove, but this version is adapted for cooking in a slow-cooker or Crock-Pot.


Ingredients

Scale
  • 2 cups frijoles pintos (pinto beans)
  • 2 cups chicken broth (substitute with vegetable broth for a vegetarian version)
  • 4 cups boiling water
  • 1/2 of a white onion, sliced 1/4 inch-thick
  • 1 chile guajillo
  • 1/2 of a small head of garlic (about 4–6 cloves)
  • 1/2 teaspoon of ground cumin
  • a few pork neck bones (leave these out for a vegetarian version)
  • 2 1/2 teaspoons kosher salt (to be added in last 45 minutes of cooking)

Instructions


  1. First, rinse your beans under cool water to remove any dirt or debris and get rid of any broken beans. There’s no need to soak the beans overnight!
  2. Layer the onion slices along the bottom of the crock-pot. Place the beans directly over the top of the onions. Tear off the stem of the chile and tuck it into the beans and nestle the pork neck bones in the beans, too. Add the chicken broth. Remove the papery skin from the garlic cloves and place in the crock-pot whole. Add the ground cumin.
  3. You’ll notice the chicken broth isn’t enough to cover the beans and keep all the ingredients moist while cooking. Add 4 cups of boiling water over the top, making sure all the ingredients are under the broth and water and then put the cover on the slow-cooker.
  4. Turn the heat on to high for 5-6 hours (individual slow-cookers can vary slightly in temperature). If the beans start to get dry during cooking, add 1-2 extra cups of boiling water. I only had to add about one cup in the last hour. You can substitute boiling chicken broth in place of the extra boiling water if you like. Add the salt in the last 45 minutes of cooking and stir it in gently to incorporate.
  5. Serve warm.


Notes

The beans should be soft to bite and have a nice broth when they’re finished, but shouldn’t be watery.

Store leftovers in an airtight container in the refrigerator for up to a week.

Did you make this recipe?

Tag @maurahernandez on Instagram and hashtag it #TOSOTT

How To, Most Popular, Recipe, side dishes, Slow-Cooker recipes, Vegetarian/Vegetariano ajo, basic chicken stock, cebolla, chile guajillo, comino, crock-pot, cumin, frijoles de la olla, garlic, kosher salt, onion, pork neck bones, slow-cooker

Cooking Combat at the Kenmore Live Studio: Chilaquiles

0 · Dec 27, 2010 · 10 Comments

Back in November, I did a cooking show with a live studio audience at the Kenmore Live Studio in Chicago. It was so much fun, I can’t wait to do another! For those who may have missed the show in person or couldn’t watch the live stream online, Kenmore was kind enough to put the show on YouTube so I could share with all of you.

¡Buen provecho!

[youtube]http://www.youtube.com/watch?v=S_8wf4HcK-Y[/youtube]

  • You can find my full recipe for chilaquiles verdes here.

Chiles, Eventos/Events, How To, MexMonday, Plato fuerte/Main dish, Recipe, Salsa, Video Chicago, Chilam Balam, chilaquiles, Chuy Valencia, Kenmore, Kenmore Live Studio, live event, Mexico Tourism Board

Agua de tuna roja

14 · Sep 30, 2010 · 27 Comments

[vimeo]http://www.vimeo.com/15416696[/vimeo]

I still remember the first time I saw tunas growing wild – José and I were visiting Mexico City one warm week at the end of the summer several years ago. One afternoon we were bored, so my suegra suggested that José take me on an official tour of Ciudad Universitaria. Also referred to as CU, it is home to the main campus of Universidad Nacional Autónoma de México (la UNAM or in English, the National Autonomous University of Mexico), the largest university in Latin America and a UNESCO World Heritage site since 2007.

This year on September 22, UNAM celebrated 100 years since its founding as the National University of Mexico as it was conceptualized by Secretary and Minister of Public Instruction and Fine Arts, Justo Sierra, and inaugurated in 1910 by President Porfirio Díaz. The university is also the successor to the Royal and Pontifical University of Mexico, founded by Spanish Royal Decree in 1551 – technically making UNAM one of the oldest universities in the Americas.

On the campus grounds, besides the historic buildings designed by some of Mexico’s most well-known architects, murals and sculptures by famous Mexican artists, an Olympic stadium that has hosted a Summer Olympic Games (1968) and a World Cup (1986), and an impressive number of students, faculty and staff, there exists a serene, green space that is as close to the original land’s flora and fauna as it might have grown freely during the height of the Aztec empire….

Read More

Aguas frescas, Culture, drinks, How To, Mexico City, Recipe, Video aguas frescas, Aztecs, cactus fruit, cactus paddle, lime, limón, Mexica, nopales, prickly pear, receta vegetariana, Tenochtitlán, Toltec, tunas, UNAM, UNESCO

HOW TO ROAST POBLANO CHILES

69 · Sep 20, 2009 · 9 Comments

Step-by-step instructions on how to roast poblano peppers using a gas stove, comal or  barbecue grill from theothersideofthetortilla.com
a fresh poblano chile before roasting

Over the years, I’ve been asked many times how to roast poblano peppers. It’s easier than you think, but takes a little bit of time because you have to roast, sweat, peel, seed and devein them to prepare them for use in a dish. Poblano chiles are used for a number of Mexican dishes such as chiles rellenos, chiles en nogada and rajas con crema, to name a few. I can’t think of many dishes I make without roasting the poblano chiles first, which gives them a more robust flavor. Poblano peppers are also called chile poblano, poblano chiles or, in some cases depending on the region, pasilla chiles. (These are not to be confused with the dried pasilla chile.)

I sometimes make the mistake of using my bare hands to peel, devein and remove the seeds of a poblano chile because it doesn’t smell too spicy. Usually each time I do, I get fooled and the back of my hands feel like they’re burning for the rest of the day. A few times, I’ve scratched my forehead only to feel the searing sensation and have a little red raspberry spot to show off my mistake.

You can save yourself from the burn by wearing fitted latex gloves.

There are several methods for roasting chiles. The two ways I prefer are over a direct flame or on a hot comal. Either way, be sure not to burn the meaty flesh of the chile or it will have a bitter taste. With both methods as the skin starts to blister, you’ll hear what sounds like little zaps of electricity or sizzling—that’s normal.

ROASTING POBLANO PEPPERS OVER A FLAME

  • Place 1-2 chiles directly on the stove burners over a medium flame. Turn with kitchen tongs as each side blisters until the skin is toasted and blackened, but it should not blacken so much that it starts to peel or turn into ash. It should take a few  minutes per side and about 10-12 minutes total, depending on how large they are.
  • You can also follow this same method  on a barbecue grill to roast more peppers at once.

ROASTING POBLANO PEPPERS ON A COMAL

  • If you don’t have a comal (a flat, thin, and usually round or oval shaped pan for cooking tortillas), use a cast-iron or heavy non-stick skillet. Heat over medium flame and add 2-3 chiles to the comal. Turn them until the surfaces are toasted and blackened. The amount of time it takes will depend on whether you have a gas or electric stove and the thickness of your comal or skillet.

Step-by-step instructions on how to roast poblano peppers using a gas stove, comal or barbecue grill from theothersideofthetortilla.com
Roasted poblano pepper

HOW TO SWEAT THE CHILES

Place the chiles in a sealed, plastic Ziploc bag to “sweat” for about 15 minutes. (You can also refrigerate the chiles for a day or two after sweating if you are not ready to peel, devein and remove the seeds for use.) Sweating has two purposes: first to remove the skin and then to cook the chile a bit further in its own vapors to acquire the characteristic taste of a freshly roasted chile. Have a bowl or plate ready to hold the skinned chiles.

Put on your latex gloves.

After 15 minutes, open the bag and one at a time, pinch part of the skin so it tears and peel it off. Remove the skins from each chile and transfer them to the bowl or plate you have waiting. Discard the skins.

HOW TO SEED AND DEVEIN POBLANO PEPPERS

To devein and remove the seeds, cut a slit along the side of the chile. Use your fingers to dislodge the seeds. Pull out what you can with your fingers and then using a slow but steady stream of cool water, rinse the inside of the chile. This should flood the rest of the seeds out if you knocked them loose but couldn’t remove them with your fingers.

Feel for any thick veins along the side of the chile. Using a small paring knife (and being careful not to pierce the skin) gently cut the veins away from the skin. Pat the chiles dry with a paper towel to remove any extra moisture inside and out.

Now the chiles are ready to prepare for a dish.

Chiles, How To chile poblano, roasting chiles

Primary Sidebar

¡Bienvenidos!

Hi, I'm Maura Hernández. Welcome to my kitchen! I'm an award-winning food and travel blogger, recipe developer, and former journalist sharing my passion for all things Mexico. Married to a Chilango, I've traveled Mexico extensively over the last 15 years. Here, you'll find a mix of traditional and modern Mexican cooking, along with my advice on where to eat, stay and play on your visit to Mexico! READ MORE

New recipes, fresh travel tips + more

Delivered straight to your inbox!

Copyright © 2023 The Other Side of the Tortilla on the Cravings Pro Theme