• Skip to primary navigation
  • Skip to main content
  • Skip to primary sidebar

The Other Side of the Tortilla

  • HOME
  • ABOUT
    • CONTACT ME
    • FAQ
    • PRESS
    • PRIVACY POLICY
    • MEDIA KIT
    • ADVERTISE
  • RESOURCES
    • BOOKS
    • SHOP
    • INGREDIENTS
    • KITCHEN TOOLS
    • Thanksgiving
    • Mexican Christmas Traditions
  • RECIPES

side dishes

Instant Pot pinto beans

19 · Mar 29, 2020 · Leave a Comment

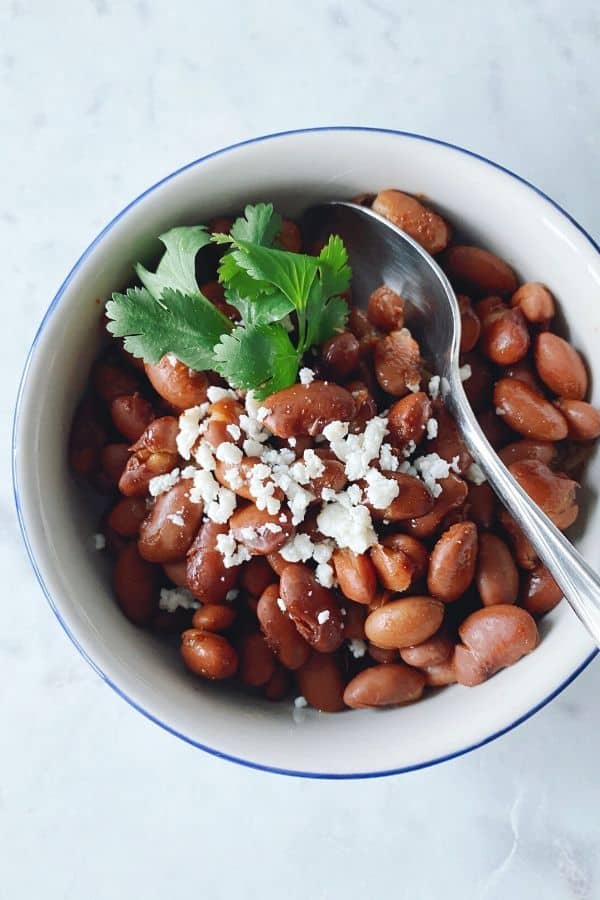
This easy, no-soak recipe for Mexican-style Instant Pot pinto beans will have your beans on the table in less than an hour, tasting just as good as the slow-cooked version you grew up with.

You’re probably used to cooking frijoles de la olla for hours on the stove-top, or even using a slow-cooker for making Crock-Pot frijoles de la olla (one of the all-time most popular recipes on this blog). With just a handful of simple ingredients and the no-soak method, these Mexican-style Instant Pot pinto beans will be on the table in no time.

While the slow-cooked beans are great, most of us don’t always have the time to wait to feed our families. Enter the glorious invention known as the Instant Pot.

…

Read More

frijoles/beans, Recipe, side dishes

How to doctor canned refried beans

95 · Oct 5, 2017 · 2 Comments

Canned refried beans are a cabinet staple in most Mexican homes, but you can expand your flavor options by doctoring your beans in a few easy steps.

If you’re like me, you probably keep a can or two of refried beans in the cabinet at all times. In fact, I usually keep a can of refried pinto beans and a can of refried black beans in there because one can never be too sure when an occasion requiring beans could arise in a Mexican-American household. Am I right?

And while you may be perfectly OK with always eating the same beans out of a can, you have no idea what you’re missing out on if you’d just play with your food a little bit!

…

Read More

Pork, Recipe, side dishes, Staple Recipes refried beans

Turkey stuffing, Mexican-style

14 · Nov 19, 2012 · Leave a Comment

Whether it’s Thanksgiving or Christmas, I’m always looking for a way to infuse Mexican ingredients into our family’s holiday traditions. I came up with this turkey stuffing recipe that’s a riff on my mom’s traditional turkey stuffing, but with a little kick from jalapeño chiles and soy chorizo (aka soyrizo).

…

Read More

Holiday dish, Holidays, Recipe, side dishes, Vegetarian/Vegetariano chorizo, Christmas, La Navidad, soyrizo, Thanksgiving

Queso fundido

20 · Dec 22, 2011 · 8 Comments

How to make queso fundido with chorizo. Get more Mexican recipes at theothersideofthetortilla.com.During the winter, I love to eat warm, hearty treats. There’s something about the winter weather that makes you want to eat things that’ll stick to your ribs, right?

This past weekend, I made a very simple queso fundido that really hit the spot. Given that I just shared a recipe for homemade chorizo earlier this week, I thought it would be nice to give you another way to use that during the holidays for a quick and easy party treat.

Whether you’re hosting at home or need to bring a dish to a posada or any other type of party, this is a super simple recipe that’s sure to wow guests. To take it to go, just prepare in the crock or a casserole dish and wait until you arrive at the party to pop it under the broiler for a few minutes. Don’t forget to bring some tortillas!

RELATED RECIPE: Vegetarian queso fundido with mushrooms and poblano chiles

We like to make tacos out of this recipe, but you can absolutely also serve it dip-style with chips if you like.

Print
Queso fundido

Prep Time: 10 minutes

Cook Time: 10 minutes

Total Time: 20 minutes

Yield: About 10 tacos

Queso fundido is a classic Mexican appetizer that can be eaten with warm tortillas or tortilla chips. You choose the mix-ins!

Ingredients

  • 4 to 5 ounces cooked chorizo
  • 14 ounces shredded Chihuahua or Quesadilla cheese
  • Non-stick cooking spray

Instructions

  1. Cook your chorizo first and set aside to drain the grease over paper towels.
  2. In a microwave-proof dish, grate the Chihuahua or Quesadilla cheese and microwave at intervals of 30 seconds until mostly melted. Stir if necessary to heat evenly.
  3. Spray a little non-stick cooking spray in a small oven-proof crock (an individual-size soup crock will hold half this recipe and is what I typically use and make a second serving). Pour the melted cheese into the crock. Add half the chorizo and fold in gently.
  4. Set your oven broiler on low and place the crock at least 6-8 inches from the flame. Heat for about 5-6 minutes or until the cheese bubbles and gets brown spots. Be sure to use a pot holder or oven mitt to remove the crock or oven-proof dish from underneath the broiler.
  5. Place the crock or dish on a trivet and serve with warm tortillas to make tacos or hearty tortilla chips if you want to serve it more as a dip.

Notes

Note: the cooking spray is completely optional; I like to use it because it helps a lot with cleanup and getting all the cheese out of the dish before it makes it to my sink.

3.1

https://theothersideofthetortilla.com/2011/12/queso-fundido/

©2009-2015 theothersideofthetortilla.com
  • What do you like in your queso fundido?

Meat, Recipe, side dishes, Snacks, Staple Recipes chorizo, queso Chihuahua, queso fundido

Camotes al chipotle: A Mexican twist on a Thanksgiving classic

6 · Nov 21, 2011 · 19 Comments

If you’ve spent even one Thanksgiving at an average American dinner table, you’ve likely encountered sweet potatoes or yams with some kind of brown sugar or maple syrup and a marshmallow topping. I’m not knocking the tradition—in fact, I grew up eating it and usually get a craving around this time of year—but there are lots of other interesting things you can do with sweet potatoes.

…

Read More

Holiday dish, Holidays, Recipe, side dishes, Sponsored, Video #MizkanLatino, camotes, chile chipotle, chipotle en adobo, piloncillo, sweet potatoes, Thanksgiving

Cebollitas asadas

211 · Jun 20, 2011 · 22 Comments

At any parrillada, cebollitas asadas are the one side dish you can count on one s being the same, no matter what kind of meats are chosen for the main dish. These grilled onions are marinated in Maggi and lime juice before being served.

Grilled knob onions with lime and salsa Maggi

I love grilling. The smell of the charcoal, the crackling sound of the fire roasting the food and the anticipation of what’s about to land on my plate. And whenever we grill in Mexico, my suegro (father-in-law) is the king of the barbecue.

Cebollitas asadas are so simple and easy to make (and almost totally impossible to mess up even if you’re not a grilling pro), it’s the single dish that most reminds me of a Sunday parrillada in Mexico.

RELATED RECIPE: Calabacitas con elote

You can add as much or as little lime juice and salsa Maggi, a Worcestershire-style seasoning sauce, or soy sauce as you like – it all depends on your taste buds. The Maggi sold in the U.S. doesn’t taste the same as salsa Maggi sold in Mexico, so I sometimes substitute low sodium soy sauce because we always keep some in the cabinet or the refrigerator.

Not only is this dish often served at barbecues and family gatherings, you can also often find them at little street food stands around Mexico. I especially love to pair this side dish with tacos de rib eye and my Mexican chimichurri-marinated flank steak.

RELATED RECIPE: Calabacitas rellenas

A note for my gluten-free friends: Salsa Maggi contains wheat gluten, wheat and wheat bran among its ingredients. A suitable alternative for you to be able to enjoy this dish is Kikkoman’s gluten-free soy sauce.

Print
clock clock iconcutlery cutlery iconflag flag iconfolder folder iconinstagram instagram iconpinterest pinterest iconfacebook facebook iconprint print iconsquares squares iconheart heart iconheart solid heart solid icon
Grilled knob onions with lime and salsa Maggi

Cebollitas

  • Author: Maura Wall Hernandez
  • Prep Time: 5 minutes
  • Cook Time: 15 minutes
  • Total Time: 20 minutes
  • Yield: 2 servings 1x
  • Category: Side dishes
  • Method: Grilling
  • Cuisine: Mexican
Print Recipe
Pin Recipe

Description

Cebollitas are a classic side dish staple at any Mexican barbecue.


Ingredients

Scale
  • 1 bunch of large spring onions (the kind with the little bulb on the end); these are sometimes called cebollitas cambray or knob onions
  • fresh-squeezed juice of 1/2 to 1 whole lime
  • Salsa Maggi (jugo sazonador) or soy sauce to taste

    Instructions

    1. Wash and grill the onions until they start to get grill marks and the bulbs look mostly cooked through. Leave the green stem tails on. (Some people don’t eat the tails; it’s up to you!)
    2. Once you’ve removed the onions from the grill, put them on a plate or in a bowl and squeeze the desired amount of lime juice over them.
    3. Add desired amount of Maggi or soy sauce over the top and let the onions sit in the juices for a few minutes. Pick up by the stems and eat the bulbs.

      Keywords: onions

      Did you make this recipe?

      Tag @maurahernandez on Instagram and hashtag it #TOSOTT

      Most Popular, Recipe, side dishes, Snacks, Street food, Vegetarian/Vegetariano cebolla, cebollitas, grilling, lime, limón, parrilla, parrillada, salsa de soya, salsa Maggi, soy sauce

      Calabacitas rellenas

      11 · Jun 6, 2011 · 2 Comments

      Calabacitas rellenas: Grilled Mexican green squash, stuffed with chilaca chiles, chorizo and queso fresco. Get the recipe from theothersideofthetortilla.com.

      One of the things I love most about the summer is grilling. It’s an opportunity to do all kinds of different things with meats and vegetables that I don’t get a chance to do during the rest of the year.

      During the spring and summer, my local Mexican markets have a wider variety of produce which means endless combinations for creative dinners at my house. I’ve recently been craving calabacita, a zucchini-like squash that has lighter green speckled skin, and is also one of José’s favorites. As I was strolling through the aisles, I was trying to decide what to stuff them with and as soon as I saw chilaca chiles, I knew that was what I wanted.

      They’re long and skinny with dark green skin, but you may recognize them better when they’re dried – known as chile pasilla. When fresh, they’re mild with a very subtle sweet flavor and you can char and peel them just the same way you do with a poblano.

      This dish is a variation of one that José grew up eating and when I served it for dinner over the weekend, the first thing he said after taking a bite was, “sabe a mi casa.” To me, that’s the ultimate compliment.

      TIPS: If you don’t have a grill or want to make this dish during other times of the year, you can also use a grill pan to cook the calabacitas. You can roast and sweat chilaca chiles in the same way you would with poblano chiles.

      If you’ve never roasted chiles before, check out my tutorial on how to roast poblano chiles.

      This dish can also be made vegetarian-friendly if you substitute soyrizo for the chorizo….

      Read More

      MexMonday, Recipe, side dishes, Snacks calabacita, cebolla, chile chilaca, chorizo, grilling, onion, parrilla, parrillada, queso fresco

      Papas gratinadas

      20 · Feb 7, 2011 · 16 Comments

      To me, wintertime means lots of comfort foods. And pardon the pun, but during the blizzard we had here last week, I was cooking up a storm while I was cooped up inside for three whole days. One of my favorite comfort foods is papas gratinadas, a Mexican version of potatoes au gratin.

      I love it so much, in fact, that while I’m writing this, I’m thinking about going to the store for more potatoes so I can make another batch. The last two times I’ve made this dish, it disappeared in less than 24 hours. And my friend Silvia over at Mamá Latina Tips has been asking me to post this recipe for several weeks since I told her I made it because her mom used to make papas gratinadas for her and it’s one of her favorites, too.

      These are a great side dish (or, um…an afternoon snack) when you need hearty, warm food to keep you full and fueled to fight the cold outside. Here’s a quick video tutorial on how to make this recipe.

      [youtube]http://www.youtube.com/watch?v=3bseuBjSf_Q[/youtube]

      …

      Read More

      How To, Recipe, side dishes, Staple Recipes, Vegetarian/Vegetariano, Video "serrano chile", cebolla, Chihuahua cheese, chile serrano, crema, crema de leche espesa, crema Mexicana, papas, potatoes, queso Chihuahua

      Crock-Pot frijoles de la olla

      183 · Jan 31, 2011 · 6 Comments

      Frijoles de la olla are a staple in Central Mexican cuisine. Traditionally, they’re cooked in a clay pot, but this version is adapted for cooking in a slow-cooker or Crock-Pot.

      There are three types of beans you typically see in frijoles de la olla recipes: frijoles bayos, flor de mayo or pinto beans. Frijoles de la olla made with those type of beans are most common in Central Mexico. All three varieties have a pinkish hue, with pinto beans being the lightest in color among them. These are also the same kind of beans I use for making frijoles charros.

      While individual recipes for frijoles de la olla may vary, they will also often include common ingredients such as onion, garlic, manteca de cerdo (pork lard), salt and hierbas de olor (herbs such as epazote or cilantro that are cooked in with the beans for flavor). Other variations may include different spices such as cumin or bay leaves.

      In Eastern Mexican states such as Veracruz and others bordering the Gulf of Mexico, as well as the South and Southeast states of the country such as Oaxaca, black beans are preferred over bayo, flor de mayo or pinto varieties. Accompaniments may also vary by region to include a fresh squeeze of lime juice, diced onion, chile serrano, chopped cilantro or crumbled fresh cheese.

      Cooking tips for frijoles de la olla

      To prep this dish the night before, add everything to the crock-pot except the liquids, pork neck bones and salt. The next day, add the liquid and pork neck bones and turn on high.

      If you’re planning to let this cook all day while you’re not home, use a slow-cooker that has a timer that will turn the heat off or to a very low “keep warm” setting after the cooking time. You can then add the salt, reheat them for 30-60 minutes in the slow-cooker and enjoy!

      If you don’t have a guajillo chile at home but you have other dried chiles, any other dried red chile you like and have on hand is an acceptable substitute. Just be sure to portion based on the heat factor! Or you can leave the chile out altogether if you prefer.

      For those who like their beans with a thicker stew-like consistency instead of broth, some cooks mash or blend a portion of the beans and then re-add to the pot as the broth cooks down.

      To make this dish vegetarian-friendly, leave out the pork neck bones and use vegetable broth instead of chicken broth.

      This recipe will give you plenty of leftovers, and it’s great as a snack, a side dish, or even a main dish with some garnishes and mix-ins.

      Print
      clock clock iconcutlery cutlery iconflag flag iconfolder folder iconinstagram instagram iconpinterest pinterest iconfacebook facebook iconprint print iconsquares squares iconheart heart iconheart solid heart solid icon
      pinto beans

      Crock-Pot frijoles de la olla

      ★★★★ 4 from 2 reviews
      • Author: Maura Wall Hernandez
      • Prep Time: 15 minutes
      • Cook Time: 6 hours
      • Total Time: 6 hours, 15 minutes
      • Yield: 10 servings 1x
      • Method: Slow-cooker
      • Cuisine: Mexican
      Print Recipe
      Pin Recipe

      Description

      Frijoles de la olla are a staple in Mexican cuisine. Traditionally, they’re cooked in a clay pot over a fire or on the stove, but this version is adapted for cooking in a slow-cooker or Crock-Pot.


      Ingredients

      Scale
      • 2 cups frijoles pintos (pinto beans)
      • 2 cups chicken broth (substitute with vegetable broth for a vegetarian version)
      • 4 cups boiling water
      • 1/2 of a white onion, sliced 1/4 inch-thick
      • 1 chile guajillo
      • 1/2 of a small head of garlic (about 4–6 cloves)
      • 1/2 teaspoon of ground cumin
      • a few pork neck bones (leave these out for a vegetarian version)
      • 2 1/2 teaspoons kosher salt (to be added in last 45 minutes of cooking)

      Instructions


      1. First, rinse your beans under cool water to remove any dirt or debris and get rid of any broken beans. There’s no need to soak the beans overnight!
      2. Layer the onion slices along the bottom of the crock-pot. Place the beans directly over the top of the onions. Tear off the stem of the chile and tuck it into the beans and nestle the pork neck bones in the beans, too. Add the chicken broth. Remove the papery skin from the garlic cloves and place in the crock-pot whole. Add the ground cumin.
      3. You’ll notice the chicken broth isn’t enough to cover the beans and keep all the ingredients moist while cooking. Add 4 cups of boiling water over the top, making sure all the ingredients are under the broth and water and then put the cover on the slow-cooker.
      4. Turn the heat on to high for 5-6 hours (individual slow-cookers can vary slightly in temperature). If the beans start to get dry during cooking, add 1-2 extra cups of boiling water. I only had to add about one cup in the last hour. You can substitute boiling chicken broth in place of the extra boiling water if you like. Add the salt in the last 45 minutes of cooking and stir it in gently to incorporate.
      5. Serve warm.


      Notes

      The beans should be soft to bite and have a nice broth when they’re finished, but shouldn’t be watery.

      Store leftovers in an airtight container in the refrigerator for up to a week.

      Did you make this recipe?

      Tag @maurahernandez on Instagram and hashtag it #TOSOTT

      How To, Most Popular, Recipe, side dishes, Slow-Cooker recipes, Vegetarian/Vegetariano ajo, basic chicken stock, cebolla, chile guajillo, comino, crock-pot, cumin, frijoles de la olla, garlic, kosher salt, onion, pork neck bones, slow-cooker

      How to make frijoles charros

      160 · Nov 8, 2010 · 18 Comments

      Frijoles charros is one of my all-time favorite Mexican dishes.

      For weeks, José had been bugging me to make his Tía Carola’s frijoles charros. Outside of El Charco de Las Ranas, his favorite taquería in Mexico City, Tía Carola’s frijoles charros are the only ones he has ever raved about.

      How to make authentic Mexican frijoles charros - recipe via theothersideofthetortilla.com

      Until the day I decided to make them.

      When I asked for the recipe, it felt like I was playing “teléfono descompuesto” with at least three people – where something surely gets lost every time someone relays the message on to another person. José called his sister, who called his aunt; then his sister called him back and he translated the ingredients to me. Note that he only relayed the ingredient list and not the portions. And he only got a vague set of instructions. Apparently, Tía Carola is not exactly keen on lots of details and also hadn’t made this dish in at least 10 years. I’d be lying if I said I wasn’t a bit nervous about making this vaunted recipe with such a vague idea of what I was supposed to do.

      I returned from the store with a big bag of pinto beans. José argued with me that I had bought the wrong beans because they were supposed to be frijoles bayos. I knew that, but couldn’t find them at the store so I settled confidently on a hand-sifted bag of carefully chosen pinto beans. I settled the argument with a quick google search that ended in my favor, which had me secretly feeling proud on the inside that I knew frijoles pintos and frijoles bayos were not the same, but often interchangeable because of their similarities in taste, color and texture ‑ especially in this recipe.

      I knew when José argued with me about the beans that he was going to be a tough customer to please. I lit one of my San Judas Tadeo candles (the patron saint of lost causes and desperate situations) and hoped for a culinary Hail Mary with my limited instructions and the guesswork lying ahead. I was short on time with no room for mistakes since I was making the frijoles charros for lunch on a weekday and all I had as a backup were some emergency TV dinners in the freezer. Who could have ever imagined there could be so much pressure behind a pot of beans?

      As I served the frijoles charros, my stomach was in knots. Would they live up to Tía Carola’s recipe? I waited for the verdict as he savored the first spoonful.

      Resounding success! “Muy bien!” José said as he nodded and ate another spoonful – as if he had perhaps doubted that I could get the recipe down on the first shot with such vague instructions. I couldn’t blame him. After all, I hadn’t been quite sure I’d be able to pull it off either, to be honest. But three servings and a high-five later, I was convinced I had gotten it perfectly right. I’ve now been making this dish for years and it’s become a staple in my kitchen, especially during the fall and winter months.

      frijoles pintos

      You need an olla express (a pressure cooker) for this recipe. Like I’ve said many times before to those who’ve asked me, you don’t need to spend a lot of money on a fancy pressure cooker with lots of bells and whistles. I have a pressure cooker that I bought at a national household goods chain for $20 (less a 20% off coupon) that I’ve had for several years and it works perfectly fine. It’s the easiest, quickest way to make just about any kind of beans from scratch. It’s a shortcut even your abuelita would approve of – trust me.

      One of the key ingredients in the flavoring of this recipe is Mexican beer, and to help you out in advance, here are a few brands I recommend: Victoria, Indio, Sol, Modelo, Bohemia, and Pacifico. In a pinch, you could also try Tecate or Corona. No matter where you live in the world, you should be able to get at least one of them!

      This recipe is perfect as an appetizer, as a meal itself or as a side. It’s especially perfect in the fall and winter because it’s hearty and will keep you warm and full. And José will tell you: it’s even better the second day. That is, if you have any leftovers.

      frijoles charros
      Print

      Frijoles charros

      Prep 20 mins

      Cook 1 hour

      Total 1 hour, 20 mins

      Author Maura Wall Hernandez

      Yield 6-8 servings

      Frijoles charros (cowboy beans) are a hearty, meaty Mexican dish that can be served as a main dish or a side.

      Ingredients

      • 1 cup pinto beans (frijoles bayos can be substituted)
      • 5 cups water
      • 2 teaspoons powdered chicken bouillon (such as Knorr Suiza)
      • 5 strips of thick center-cut bacon
      • 4 ounces Mexican chorizo, cooked (I use pork, but you can also use beef)
      • 4 Roma tomatoes (known in Mexico as jitomate Saladet)
      • 4-5 serrano chiles
      • ½ of a large white onion, sliced
      • 1 clove of garlic (optional)
      • 1 cup (8 fluid ounces) Mexican beer
      • 1-2 small sprigs of cilantro
      • salt to taste

      For garnish:

      • Finely diced white onion
      • Finely diced serrano chile
      • Crushed chicharrón (called pork cracklings in English)

      Instructions

      1. Rinse your beans well and remove any broken pieces. Add the beans and chicken buillon to the pressure cooker and cover with the water. Close the lid and heat on high until the safety valve closes on the pot and the pressure gauge begins to rock gently and consistently (or if your pressure cooker doesn’t have a rocking gauge, follow the directions that came with the pot). Allow the beans to cook for 20-25 minutes.
      2. While the beans are cooking, remove the stems of the tomatoes and roast them under the broiler in the oven with the onion, chiles and optional garlic. Turn them to the other side when you notice them getting darkened. Remove from the broiler and set aside.
      3. On the stovetop, cook the bacon in a frying pan until it is moderately crispy. Remove from the pan and drain on paper towels. Tear the bacon into bite-sized pieces and set aside.
      4. Next, cook the chorizo over medium heat in a frying pan, making sure to break up the meat into small pieces. Be sure not to overcook the chorizo. Drain on paper towels if necessary.
      5. By this time, the beans should be halfway done. Remove the pot from the heat. If desired, you can gently alleviate the pressure by using an oven mitt to set the pressure gauge slightly off-kilter to allow steam to escape until the safety valve unlocks. Caution: it will be very hot and will burn you if you don’t protect yourself with an oven mitt. I like to also use a kitchen towel to catch the steam carefully in addition to wearing the mitt. If you’re not confident about trying this method, don’t worry – just let the pot sit after you’ve removed it from the heat until you hear the safety valve unlock. It will take a little longer that way, but if you’re at all nervous about safety because you’re a first-time pressure cooker user, just let it rest and cool on its own.
      6. Add the roasted tomatoes, chiles, onion and optional garlic into the blender and puree until completely smooth. Add torn bacon and chorizo to the blender and pulse blender until incorporated. The mixture will turn a shade of reddish-orange thanks to the chorizo.
      7. Open the pressure cooker once the safety valve has unlocked. You still should handle the pot carefully – using oven mitts, slowly open the pot facing away from you so any remaining steam escapes safely. There should still be a decent amount of liquid in the pot covering the beans. If not, add a little water until the beans are completely covered.
      8. Add the mixture from the blender to the pot and then the beer; stir once, throw the small sprig of cilantro on top and close the pot back up securely. Put it back on medium-high heat until the pressure gauge rocks gently and consistently again (it should not spin or spit liquid; if it does, the heat is too high). Reduce the heat just slightly and cook for another 25-30 minutes.
      9. Remove from heat and allow to cool using the same method as before. Once you open the pot, the beans are ready to be served; just add salt to taste.
      10. Garnish with finely diced white onion, serrano chile, crushed chicharrón and if desired, a few fresh cilantro leaves.

      Notes

      The cook time for this recipe is based on using a pressure cooker.

      Cuisine Mexican


      Cilantro for frijoles charros - recipe via theothersideofthetortilla.com


      Meat, Most Popular, Plato fuerte/Main dish, Pork, Pressure Cooker Recipes, Recipe, side dishes chicharrón, chorizo, Tía Carola

      Classic guacamole recipe

      6 · Sep 16, 2010 · 5 Comments

      mi papel picado bicentenario

      ¡Feliz Día de la Independencia, México!

      Did you watch the Grito last night?

      In my house, we hung papel picado and waved our Mexican flag as we watched the celebration starting in Mexico City’s zócalo. My heart was filled with emotion seeing the zócalo, where I have stood in awe many times, brimming with people from all corners of Mexico to celebrate the bicentennial of Independence from Spain and 100 years since the Revolution.

      If you missed the Grito, the shout of independence honoring Mexico’s national heroes, you can watch it here:

      If you want to watch last year’s Grito and attempt a very traditional Independence Day recipe, you can check out the chiles en nogada I made and posted last year here on The Other Side of The Tortilla….

      Read More

      Cultura/Culture, Historia/History, Holiday dish, Holidays, Mexico City, Recipe, side dishes, Staple Recipes aguacate, ajo, avocado, bicentenario, bicentennial, chile serrano, chiles en nogada, cilantro, Conservatorio de la Cultura Gastronómica Mexicana, día de la independencia, El Grito, garlic, guacamole, Instituto Nacional de Antropologia y Historia, lime, limón, Mercado Coyoacán, Mexican Independence Day, molcajete, papel picado, tejolote, UNESCO

      Rajas con crema

      203 · Feb 8, 2010 · 20 Comments

      Rajas con crema, a hearty dish made with poblano chiles, onion, crema mexicana and a little bit of cheese, is a favorite in my house. As one friend put it, “anything that comes out of your kitchen at least once a week has got to be good.”

      Rajas are particularly popular in central and Southern Mexico, and are so versatile I’ve seen them served as breakfast, lunch and dinner. I can’t speak for all of Mexico, but at least in Mexico City when someone is talking about rajas, they are usually talking about strips of poblanos or this dish specifically.

      rajas con crema

      According to my husband, José, rajas con crema are the best when the poblanos have a spicy bite, but they’re not too hot. Usually you can tell how hot the poblanos are when you’re removing the seeds after roasting because the heat will burn your skin and if you breathe in too deeply, you might cough. In that case, you may want to soak them in a solution of vinegar and water so they’re not too spicy. If those two things don’t happen, sometimes I skip the vinegar and water soak after roasting the chiles. However, f you soak them too long, the chiles are a little sweet rather than spicy but still delicious nonetheless.

      If you’ve never prepared rajas before, you’ll want to first read my tutorial on how to roast poblano chiles before you skip to the directions below.

      Some rajas con crema recipes call only for cream, and lots of it; others call for so much cheese that it’s more of a queso fundido in disguise. Mexican sour cream isn’t actually sour like American sour cream; it has a less acidic taste and a thinner consistency. The cheese should melt slowly and not be gooey, and it should be barely visible once incorporated. It’s really more of a bonding agent so the cream doesn’t get soupy.

      RELATED: Vegetarian queso fundido with rajas

      My version, based on a recipe José grew up eating, strikes a perfect balance. Some people like to eat rajas con crema over rice, or as a side dish with meat like carne tampiqueña (a grilled filet or skirt steak) or cecina (a thinly-cut aged salted beef). In our house, as you may already be fully aware if you’re a regular reader, the taco is king. However you decide to serve it, though, I guarantee it won’t be long before you’re making it again.

      chiles poblanos asados

      We like to serve rajas in corn tortillas as tacos. Sometimes I make cecina to accompany the rajas but they can stand up as a vegetarian meal on their own or as a hearty side with rice, beans, meat or whatever else you’d like.

      RELATED: How to roast poblano chiles

      Print

      Rajas con crema

      Author Maura Wall Hernandez

      Yield 12 servings

      Rajas con crema is a hearty dish made with poblano chiles, onion, Mexican sour cream and a little bit of cheese. It's used as a taco filling or served as a side dish.

      Ingredients

      • 5-6 poblano chiles, roasted, skinned and cut into strips
      • 1/2 of a large white onion, sliced into rings and then cut in half (to make half moon strips)
      • 2 tablespoons salted butter (do not substitute margarine)
      • 5 ounces crema Mexicana
      • 1/2 of coarsely shredded Chihuahua cheese
      • A pinch of kosher salt, or more to taste

      Instructions

      1. Roast poblano chiles. Allow them to sweat for 15 minutes, then peel off the skins, remove seeds and cut into strips. 
      2. Using a deep skillet, melt the butter and cook the onions in the butter on medium-low heat until they start to change color and caramelize a bit (slightly transparent and a little brown). Turn off burner and remove pan from heat.
      3. Add the chile strips (rajas) in the pan with the onion, stir to coat well with the remaining butter, and warm over medium heat until the rajas are warm and a little wilted.
      4. Add about 5 ounces of crema and stir in well. Cook for about 2-3 minutes and then reduce heat to low and add a half cup of coarsely grated Chihuahua cheese (if you can't find cheese labeled Chihuahua, any cheese labeled "queso para fundir" will do). The cheese should melt slowly and not be gooey, and it should be barely visible once incorporated. It’s really more of a bonding agent so the cream doesn’t get soupy. Once the cheese is melted, turn your burner as low as it will go, just so it is on to keep the rajas warm.

      Notes

      Leftovers can be stored in an airtight container in the refrigerator for up to 5 days, and reheated on the stove over medium heat or in the microwave at 30-second intervals.


      Plato fuerte/Main dish, Recipe, side dishes, Vegetarian/Vegetariano butter, cebolla, cheese, chile poblano, crema Mexicana, mantequilla, onion, Poblano pepper, queso Chihuahua

      Primary Sidebar

      ¡Bienvenidos!

      Hi, I'm Maura Hernández. Welcome to my kitchen! I'm an award-winning food and travel blogger, recipe developer, and former journalist sharing my passion for all things Mexico. Married to a Chilango, I've traveled Mexico extensively over the last 15 years. Here, you'll find a mix of traditional and modern Mexican cooking, along with my advice on where to eat, stay and play on your visit to Mexico! READ MORE

      New recipes, fresh travel tips + more

      Delivered straight to your inbox!

      Copyright © 2023 The Other Side of the Tortilla on the Cravings Pro Theme