• Skip to primary navigation
  • Skip to main content
  • Skip to primary sidebar

The Other Side of the Tortilla

  • HOME
  • ABOUT
    • CONTACT ME
    • FAQ
    • PRESS
    • PRIVACY POLICY
    • MEDIA KIT
    • ADVERTISE
  • RESOURCES
    • BOOKS
    • SHOP
    • INGREDIENTS
    • KITCHEN TOOLS
    • Thanksgiving
    • Mexican Christmas Traditions
  • RECIPES

Meat

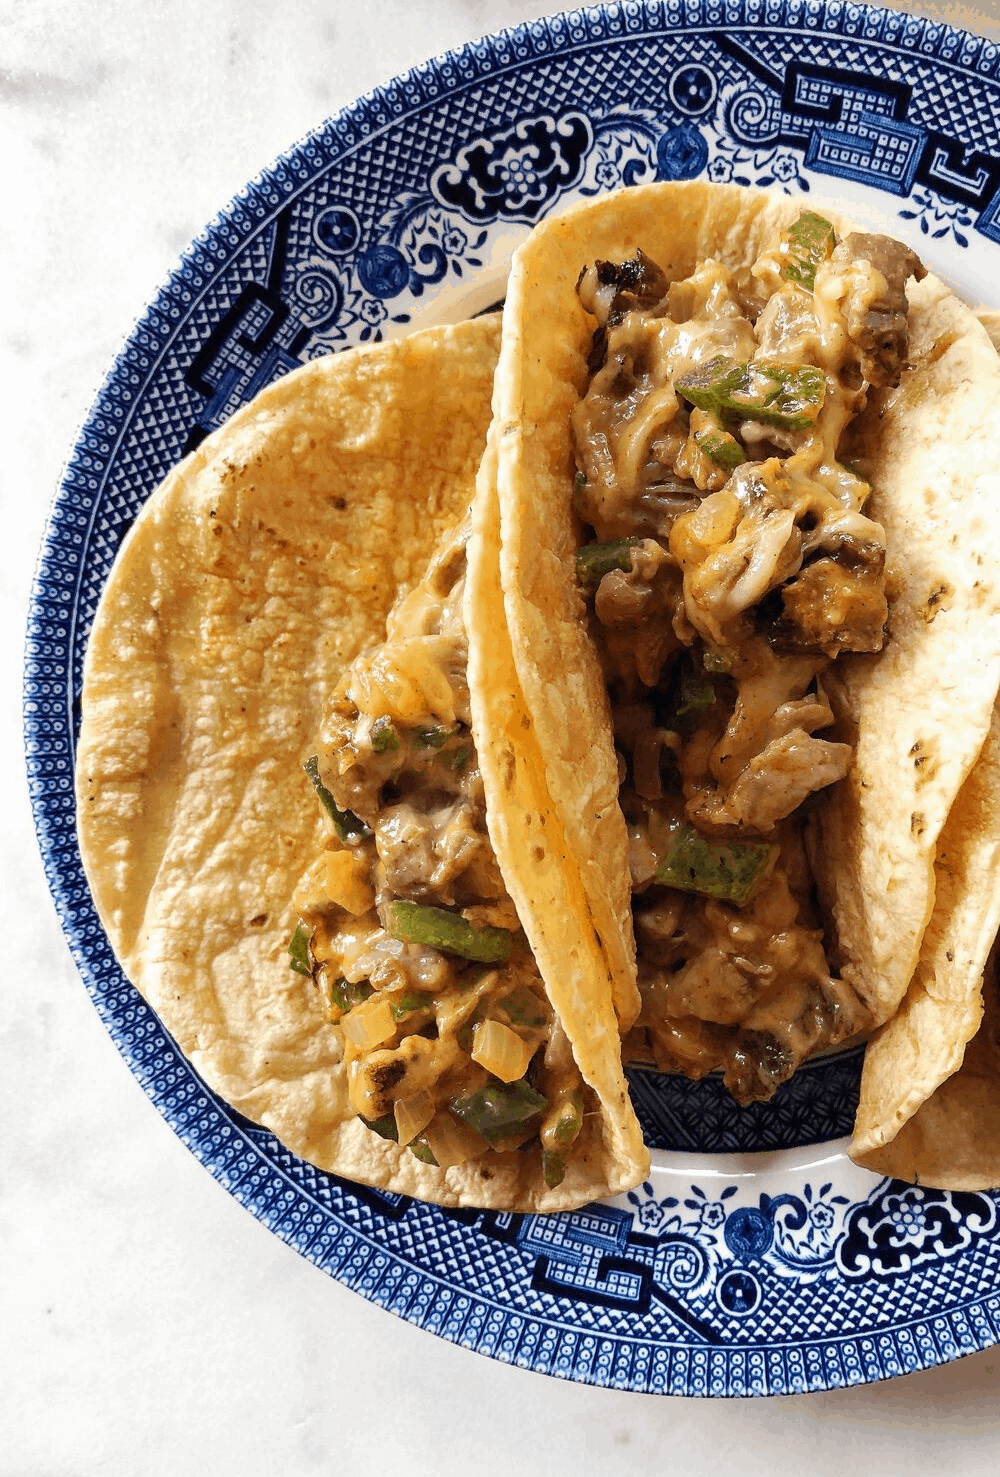
Steak and chorizo tacos de alambre

13 · Mar 7, 2020 · Leave a Comment

An alambre is a popular staple taquería dish in Mexico that contains meat, vegetables and melted cheese to hold it all together.

There’s a taquería in Mexico City called Las Brasas that’s famous, in part, for their large alambre selection. Located in the Plateros neighborhood since 1977, there’s more than a dozen types of alambre combinations on their menu.

tacos de alambre with agua fresca

My family has been obsessed with this place since we discovered it. So, I decided to make a copycat recipe at home! It’s an awesome, easy and quick weeknight dinner. You can get it together even quicker if you prep the veggies beforehand.

We also make a pork alambre at home as a red meat-free alternative to this version. That recipe is made with thinly sliced pork chops or pork tenderloin and bacon. Both versions are very filling and I sometimes double the recipe so I can take leftovers to work for lunch.

Watch this video to see how easy it is to make!

…

Read More

Beef, Meat, Recipe, Tacos

How to doctor canned refried beans

99 · Oct 5, 2017 · 2 Comments

Canned refried beans are a cabinet staple in most Mexican homes, but you can expand your flavor options by doctoring your beans in a few easy steps.

If you’re like me, you probably keep a can or two of refried beans in the cabinet at all times. In fact, I usually keep a can of refried pinto beans and a can of refried black beans in there because one can never be too sure when an occasion requiring beans could arise in a Mexican-American household. Am I right?

And while you may be perfectly OK with always eating the same beans out of a can, you have no idea what you’re missing out on if you’d just play with your food a little bit!

…

Read More

Pork, Recipe, side dishes, Staple Recipes refried beans

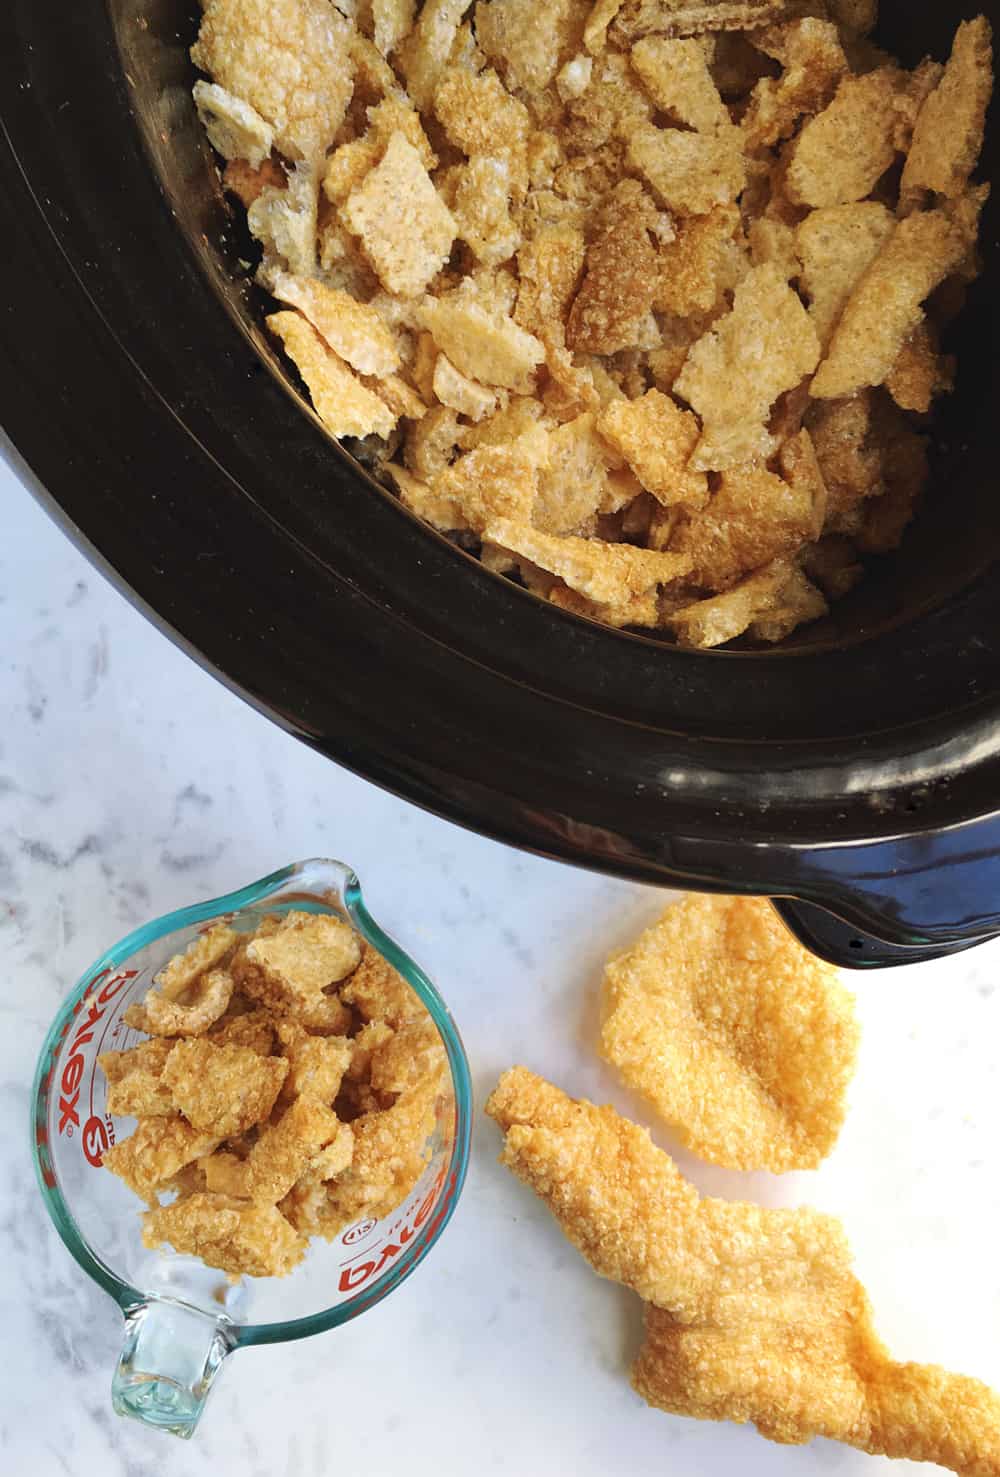
Tacos de chicharrón guisado in the slow-cooker

96 · Jun 20, 2017 · 1 Comment

Chicharrón guisado is an easy, flavorful dish made from crunchy, fried pork skin stewed in salsa, and it makes incredible tacos.

The best part about this dish is that it’s incredibly easy to make, packs a ton of flavor, and using a slow-cooker means it’s mostly a hands-off recipe.

How to make tacos de chicharrón guisado in the slow-cooker via theothersideofthetortilla.com

There’s a taquería in Los Angeles I really love called Guisados. They make a taco de chicharrón guisado that’s very similar to this recipe, and they serve it on a corn tortilla over refried black beans, and topped with a little dollop of avocado salsa verde, which is how I served them here as well, but you can serve it without beans (or different beans) and whatever kind of salsa you like on top.

There are lots of recipes out there for chicharrón guisado—mostly in Spanish—and there’s one key departure in my version aside from using a slow-cooker: I use chile morita, which is a small, dried and smoked chile. I also like to serve these on smaller tortillas (about 4.5 inches round instead of the standard 6 inches) because it makes you feel more like you’re in a taquería….

Read More

Meat, Plato fuerte/Main dish, Pork, Recipe, Slow-Cooker recipes slow-cooker, tacos

Baked Taquitos

3 · Apr 16, 2015 · 3 Comments

These baked taquitos, or baked flautas, are a healthier version of the classic fried taquito that your family will love!

As a kid, one of my all-time favorite meals was taquitos de pollo (in fact, it still is one of my favorites). Anytime my mom would take me to a Mexican restaurant, I would always order this fried taco dish no matter what else was on the menu—whether it was called a taquito, flauta, or something else.

Make baked taquitos or flautas instead of fried! Recipe via theothersideofthetortilla.com

This post is part of a compensated campaign with Herdez. All opinions and the recipe here are my own.

So I wanted to recreate an easier, healthier, kid-friendly version of my childhood favorite. …

Read More

Plato fuerte/Main dish, Poultry, Recipe, Sponsored Herdez

Frijol con puerco

9 · Nov 22, 2014 · 2 Comments

Frijol con puerco is a popular dish from the Yucatán area of Mexico and is considered a guiso, or stew.

frijol-con-puerco-recipe-TOSOTT

This post is part of a compensated campaign with the National Pork Board but all opinions and the recipe here are my own.

I like to use boneless country-style ribs for this dish, as they typically are very meaty and juicy. This cut comes from the sirloin or rib-end of the pork loin.

Traditionally, this dish was sometimes also made with the tail and ear as well. However, in modern times, it’s become more common to see the dish made without it. This recipe was originally taught to me by a family friend in 2009 and I’ve since adapted it to my own style.

RELATED RECIPE: Slow-cooker cochinita pibil
…

Read More

Meat, Plato fuerte/Main dish, Pressure Cooker Recipes, Recipe, Sponsored black beans, National Pork Board, pork, rice

Tinga de pollo

46 · Oct 21, 2014 · 5 Comments

Chicken tinga, also known as tinga poblana or tinga de pollo, is a flavorful, authentic Mexican dish that you can get on the dinner table in less than an hour.

 There are a few key ingredients to this recipe that help you get it on the table quickly: Store-bought rotisserie chicken, tomato sauce and canned diced tomatoes. Like many traditional Mexican dishes, tomatoes are an important flavor as the base of this recipe. And if you shred the chicken in advance or have some help shredding it, you’ll really have dinner ready in no time!

How to make tinga poblana, a Mexican dish with a tomato base and shredded chicken. Great for tostadas, tacos, served with rice, or as a quesadilla! This dish is also sometimes known as tinga de pollo or chicken tinga. Recipe via theothersideofthetortilla.com

This post is part of a compensated campaign in collaboration with Hunt’s and Latina Bloggers Connect. All opinions and the recipe are my own. 

This tangy, slightly spicy, stewed dish originally comes from the state of Puebla and is sometimes also made with shredded beef or pork instead of chicken. Ingredients in this dish can sometimes vary slightly from family to family, but most recipes have a tomato base, call for chorizo and fresh tomatillos—all of which, when combined, lend a little umami flavor and texture to this popular dish.

RELATED: Fideo seco

How to make tinga de pollo, a Mexican dish with a tomato base and shredded chicken. Great for tostadas, tacos, served with rice, or as a quesadilla! This dish is also sometimes known as tinga poblana or chicken tinga. Recipe via @MauraHernandez on The Other Side of The Tortilla.

Cooking with fresh, natural and quality ingredients to feed my family is very important to me and I know it’s important to you, too. I’ve used Hunt’s tomato sauce and canned tomatoes in my kitchen for several years because they’re grown in California, canned within hours of being picked, have no artificial preservatives and are 100 percent natural, so I feel good about feeding my family with healthy, natural ingredients in my recipes that call for tomatoes when they’re out of season or I don’t have time to make tomato sauce from scratch.

Paired with chipotles in adobo sauce and fresh onion, garlic, and spices you surely already keep in your pantry, this dish is sure to become a family favorite if it isn’t already a dish you eat regularly.

And the bonus? You really only need to dirty one pan to make it! 

Tinga is commonly served on top of tostadas with garnishes such as crema mexicana, avocado, shredded lettuce and queso fresco. Tinga can also be served on its own with a side of rice, as tacos or inside of a quesadilla (sometimes known as tingadillas).

RELATED: Paella with Spanish chorizo, chicken and Brussels sprouts


How to make tinga de pollo, a Mexican dish with a tomato base and shredded chicken. Great for tostadas, tacos, served with rice, or as a quesadilla! This dish is also sometimes known as tinga poblana or chicken tinga. Recipe via @MauraHernandez on The Other Side of The Tortilla.
Print

Chicken tinga

Prep 30 mins

Cook 20 mins

Total 50 mins

Author Maura Wall Hernandez

Yield 4-6 servings

Tinga de pollo is a Mexican dish from Puebla with a tomato base and shredded chicken, along with chorizo, tomatillos and spices. This dish is also commonly known as tinga poblana or chicken tinga.

Ingredients

  • 4 cups shredded rotisserie chicken
  • ½ cup cooked chorizo (about 6-7 ounces uncooked depending on the brand)
  • ¾ cup white onion, diced (about half of a large onion)
  • 2 garlic cloves, crushed
  • 1 ¼ cups Hunt’s tomato sauce
  • 2 chipotle chiles in adobo sauce
  • 6 tablespoons adobo sauce (from canned chipotles in adobo)
  • 1 cup Hunt’s petite diced tomatoes
  • 3 ½ ounces fresh tomatillos (about 4 small-to-medium sized tomatillos)
  • ¾ teaspoon dried Mexican oregano
  • ½ teaspoon dried thyme
  • ¼ teaspoon dried marjoram
  • ¼ teaspoon freshly ground black pepper
  • 2 bay leaves

Instructions

  1. Cook 6-7 ounces of chorizo in a frying pan. Drain grease from cooked chorizo on
  2. While the chorizo is cooking, hand-shred rotisserie chicken until you have four cups and set aside.
  3. In a large skillet over medium heat, combine cooked chorizo, diced white onion and garlic. Sautee until the onion starts to turn transparent, about 5-7 minutes.
  4. In a blender or a small food processor, add 1 ¼ cups Hunt’s tomato sauce, 2 chipotle chiles and 6 tablespoons of adobo sauce from the canned chipotles in adobo. Puree until completely smooth.
  5. Pour the tomato sauce mixture into the skillet and reduce the heat to low. Add 1 cup of Hunt’s petite diced tomatoes, Mexican oregano, thyme, marjoram, freshly ground pepper and tuck two bay leaves into the skillet so they’re submerged in the sauce. Stir to incorporate all ingredients.
  6. Add shredded chicken and fresh tomatillo wedges and stir to coat. Reduce heat to simmer and cover. Cook for 15-20 minutes, until chicken is completely heated through and the sauce has reduced slightly.
  7. Remove from heat and serve.

Notes

Serve on top of tostadas with crema mexicana and avocado (as pictured in this recipe); or with a side of rice, as tacos or inside of a quesadilla (known as tingadillas).

Courses Lunch/Dinner

Cuisine Mexican

Get more recipes—in Spanish and English—from the Colección de recetas de Hunt’s y Kraft.

Meat, Plato fuerte/Main dish, Poultry, Recipe, Sponsored avocado, bay leaf, crema Mexicana, hoja de laurel, Hunt's, marjoram, mejorana, Puebla, rotisserie chicken, thyme, tinga, tomatillo, tomillo

Slow-cooker carnitas

12 · Oct 18, 2014 · 4 Comments

How to make Mexican carnitas with a slow-cooker. Recipe on theothersideofthetortilla.com.

This post is part of a compensated campaign with the National Pork Board, but all opinions and the recipe here are my own.

Slow-cooker carnitas are great for an easy weeknight family dinner or for a weekend gathering. This is a super simple meal with only four ingredients that you can also prepare in advance and reheat.

Carnitas are typically a true nose-to-tail kind of dish where almost the entire pig is used. My husband loves this recipe and says that it’s similar to ordering maciza, which is mostly lean and white meat. If you’re used to eating carnitas and order “surtido” (which includes a little bit of everything), you can simulate that by buying a pork shoulder that has a cap of fat on one side. The fat will partially cook down and melt in the slow-cooker, and the soft remains left over at the end can be chopped up and mixed in with the shredded meat. (And you can use some of the liquid fats to moisten the meat before storing, so it doesn’t dry out when reheated, too.) 

RELATED RECIPE: Slow-cooker cochinita pibil

This recipe is made with pork shoulder which can also be called Boston butt roast or pork butt, depending on the region of the U.S. where you live. In Mexico, this area of the pig is often called espaldilla or cabeza de lomo, which are adjacent cuts that come from the top of the front legs of the pig and just above. These cuts are typically well-marbled and are very versatile, but the best way to use them, in my opinion, is to cook them low and slow (at a low temperature over a long period of time) so that the meat becomes fork-tender. 

If you’re not very familiar with pork shoulder, you may have already eaten it before without even realizing it; when you buy ground pork from the grocery store, it’s oven made from pork shoulder. And it makes great chorizo!

RELATED RECIPE: Homemade pork chorizo

If you can’t find a boneless roast, you can buy a little larger piece to account for the weight of the bone. You can cook it the same way, just leaving the bone in, and then remove the bone before serving. A bonus to cooking this cut low and slow: you can also render your own pork fat—the same way you would with bacon—and transfer to a jar and store in the refrigerator.

This recipe serves four people for a light meal (about three tacos each), or two people for a larger meal. If you wish to serve more people, or simply have more leftovers, you can double the size of the pork roast to 4 pounds, add three slices of thick-cut bacon and two more dried bay leaves.

Print
Slow-cooker carnitas

Prep Time: 10 minutes

Cook Time: 8 hours

Total Time: 8 hours, 10 minutes

Yield: 2-4 servings

Slow-cooker carnitas

Ingredients

  • 2 pounds boneless Boston butt roast (pork shoulder)
  • 5 slices thick-cut smoked bacon
  • 1.5 to 2 teaspoons sea salt
  • 2 dried bay leaves

Instructions

  1. Line the bottom of your slow-cooker with three pieces of bacon and put the bay leaves on top of the bacon.
  2. Sprinkle about half of the sea salt on one side of the pork roast, and the remaining salt on the other side. Place the pork roast over the bacon and bay leaves.
  3. Place the remaining two slices of bacon over the top of the pork roast and put the lid on the slow-cooker. Turn the slow-cooker to low and let it cook for 8 hours.
  4. After 8 hours, remove the meat from the slow-cooker with a slotted spoon to a large bowl and shred well with a fork.
  5. Serve with warm corn tortillas and garnishes such as diced white onion, chopped cilantro and salsa of your choice.
3.1

https://theothersideofthetortilla.com/2014/10/slow-cooker-carnitas-recipe/

©2009-2015 theothersideofthetortilla.com

For more information and recipe ideas visit porkbeinspired.com or The National Pork Board’s Spanish-language website, porkteinspira.com.


Meat, Plato fuerte/Main dish, Recipe, Slow-Cooker recipes, Sponsored National Pork Board, pork

Tacos de longaniza en salsa verde

14 · Oct 3, 2013 · 5 Comments

Quick and easy meals for weeknights are essential in most households, mine included. But if you’re like me, you still want to put something at least semi-homemade on the table to please your family at dinnertime. Longaniza en salsa verde is one of my go-to dishes that’s both easy and quick to make and can also use homemade or store-bought ingredients depending on how much time you’ve got to cook.

tacos de longaniza en salsa verde

If you have the time, you can make my salsa verde recipe from scratch (but I suggest that you leave out the salt until after it’s cooked; longaniza can be rather salty so you may find you don’t need to add any salt in the salsa). If you don’t have time to make the salsa, you can use your favorite brand of store-bought salsa verde. I often serve this dish with a side of black beans diced onion and chopped cilantro as garnish….

Read More

Meat, Plato fuerte/Main dish, Recipe, Tacomiendo longaniza, salsa verde, tacos

Alambre de la Patrona

17 · Mar 29, 2013 · 4 Comments

This taco de alambre recipe is a Mexico City-style taco made with thinly sliced pork, bacon, chile poblano, onion and cheese.

I haven’t written much here about my favorite taquería in Chicago, La Lagartija, but have always widely recommended the place to anyone who asked me in person, on Facebook or Twitter about where to get an authentic Mexican meal in my hometown. I wasn’t exactly trying to keep it a secret, but it’s definitely a gem and I always appreciated the neighborhood charm and the way that the meseras and owners always remembered us and greeted us like family. I have so many photos of memorable meals we ate there, and it was the only place in Chicago where we’d regularly eat tacos al pastor.

RELATED RECIPE: Slow-cooker carnitas

But one of my favorite standby meals there, the alambre, is both succulent and super easy to recreate at home. This recipe is my own spin on one of their alambres. The owners are from Mexico City, and the dish on their menu is actually a version of a popular dish at one of our favorite taquerías in Mexico City, El Charco de las Ranas. This dish is also sometimes known as alambre de chuleta and is best served with warm tortillas, but you can skip the tortillas if you like and just eat it with a fork.

alambre_de_la_patrona_tacos…

Read More

Finding Mexico in Chicago, Meat, Plato fuerte/Main dish, Recipe, Tacomiendo "El Charco de Las Ranas", bacon, cebolla, Chicago, chile poblano, La Lagartija Taquería, Mexico City, onion, pork, puerco, tocino

Huevo con chorizo breakfast tacos

5 · Jun 11, 2012 · 2 Comments

Tacos for breakfast? You bet. One of the staple breakfast dishes that I like to eat both when I’m visiting Mexico and at home is huevo con chorizo in the form of a breakfast taco. Literally, it’s just egg and chorizo, but don’t think something so simple can’t still be satisfying.

How to make huevo con chorizo breakfast tacos from theothersideofthetortilla.com

Most people know how to make this easy and tasty breakfast, but surprisingly I still sometimes get asked how to make huevo con chorizo. Here are my step-by-step photos taken over breakfast this past weekend in case you’re not familiar with this dish….

Read More

Breakfast and Brunch, Meat, Recipe chorizo, egg, huevo, salsa verde, tortilla

Tacos de rib eye

6 · May 8, 2012 · 3 Comments

I’ve been buying thinly sliced rib eye and grilling it to serve as tacos for years, but the truth is that it can get kind of boring. I recently came up with a flavorful and easy fix that is literally only one ingredient but makes a world of difference: ponzu sauce. Yes, you read that correctly, I said ponzu sauce! I knew I had to share this recipe when my husband and chief taste-tester raved about this dish, even days after I served it.

No, ponzu sauce isn’t a Mexican ingredient, but it bears some striking similarities to the popular seasoning sauce known as Maggi that is widely consumed in Mexico. You may remember reading about Maggi here before in my cebollitas recipe, which is basically just grilled spring onions, lime juice and Maggi—a succulent side dish that also pairs well with these tacos.

What’s great about ponzu sauce is that it’s similar to Maggi in taste, already has a hint of citrus so adding lime juice isn’t necessary (but you still can, if you want), and ponzu is much lower in sodium per tablespoon than Maggi.

If it’s any indication how good it is, I’ve whipped this recipe up for dinner three times in the last two weeks and gotten no complaints about repeating the same dish. I’ve served it each time with a different salsa to make it just a little different. With grilling season right around the corner, this dish is definitely going to be my secret weapon for summer barbecues. Let me know how you like it!

RECETA | RECIPE

TACOS DE RIB EYE

  • 1 lb. thinly sliced rib eye (about 1/4 inch thick)
  • 1/2 cup Mitsukan ponzu sauce for the meat plus 1/8 cup for cebollitas
  • 1 bunch of cebollitas (in English they’re called spring onions; they look like scallions but with a bulbous end instead of straight and skinny)

Directions:
FOR THE MEAT
Marinade the meat with 1/2 cup ponzu sauce for 30 minutes in a zippered plastic bag. Discard the liquid and bag, and grill meat over medium-high heat just long enough for each side to get grill marks and cook through.

FOR THE CEBOLLITAS
Use as much or as little ponzu as you’d like. You can choose whether to use the ponzu to soak the onions in advance, or pour over them or use as a dipping sauce after grilling. If you choose to soak them, you can put them in a shallow bowl and use about 1/8 cup-1/4 cup of ponzu sauce. Reserve the sauce if you’d like to use it again as a garnish or dip after grilling.

Serve meat with cebollitas and corn tortillas. These tacos also go great with guacamole or a fresh green salsa.

Yields 2 servings or about 6-8 tacos.

  • How do you dress up your basic rib eye tacos?
Disclosure: This post is part of a sponsored series to promote Mizkan cooking wines, vinegars, sauces and marinades. We also received product samples and promotional material from Mizkan to assist in preparing this post. All opinions and recipes in this series are our own.

Meat, Recipe, Sponsored cebollitas, guacamole, Mitsukan ponzu sauce, Mizkan, ponzu sauce, rib eye, salsa Maggi, salsa verde

Queso fundido

20 · Dec 22, 2011 · 8 Comments

How to make queso fundido with chorizo. Get more Mexican recipes at theothersideofthetortilla.com.During the winter, I love to eat warm, hearty treats. There’s something about the winter weather that makes you want to eat things that’ll stick to your ribs, right?

This past weekend, I made a very simple queso fundido that really hit the spot. Given that I just shared a recipe for homemade chorizo earlier this week, I thought it would be nice to give you another way to use that during the holidays for a quick and easy party treat.

Whether you’re hosting at home or need to bring a dish to a posada or any other type of party, this is a super simple recipe that’s sure to wow guests. To take it to go, just prepare in the crock or a casserole dish and wait until you arrive at the party to pop it under the broiler for a few minutes. Don’t forget to bring some tortillas!

RELATED RECIPE: Vegetarian queso fundido with mushrooms and poblano chiles

We like to make tacos out of this recipe, but you can absolutely also serve it dip-style with chips if you like.

Print
Queso fundido

Prep Time: 10 minutes

Cook Time: 10 minutes

Total Time: 20 minutes

Yield: About 10 tacos

Queso fundido is a classic Mexican appetizer that can be eaten with warm tortillas or tortilla chips. You choose the mix-ins!

Ingredients

  • 4 to 5 ounces cooked chorizo
  • 14 ounces shredded Chihuahua or Quesadilla cheese
  • Non-stick cooking spray

Instructions

  1. Cook your chorizo first and set aside to drain the grease over paper towels.
  2. In a microwave-proof dish, grate the Chihuahua or Quesadilla cheese and microwave at intervals of 30 seconds until mostly melted. Stir if necessary to heat evenly.
  3. Spray a little non-stick cooking spray in a small oven-proof crock (an individual-size soup crock will hold half this recipe and is what I typically use and make a second serving). Pour the melted cheese into the crock. Add half the chorizo and fold in gently.
  4. Set your oven broiler on low and place the crock at least 6-8 inches from the flame. Heat for about 5-6 minutes or until the cheese bubbles and gets brown spots. Be sure to use a pot holder or oven mitt to remove the crock or oven-proof dish from underneath the broiler.
  5. Place the crock or dish on a trivet and serve with warm tortillas to make tacos or hearty tortilla chips if you want to serve it more as a dip.

Notes

Note: the cooking spray is completely optional; I like to use it because it helps a lot with cleanup and getting all the cheese out of the dish before it makes it to my sink.

3.1

https://theothersideofthetortilla.com/2011/12/queso-fundido/

©2009-2015 theothersideofthetortilla.com
  • What do you like in your queso fundido?

Meat, Recipe, side dishes, Snacks, Staple Recipes chorizo, queso Chihuahua, queso fundido

Homemade chorizo

84 · Dec 20, 2011 ·

 Homemade chorizo is a lot easier to make than you think!

How to make your own homemade chorizo. Get this and more Mexican recipes at theothersideofthetortilla.com.

I always used to buy chorizo prepackaged or from the butcher because I thought it would be too hard to make at home. After months of wondering, I finally decided to delve in and give it a shot. The results were fantastic! Now that I know how incredibly easy it is to do on my own, I’ll think twice next time I reach for a package of chorizo in the grocery store.

RELATED RECIPE: Queso fundido with chorizo

A lot of people think of Spanish chorizo when they read chorizo in an ingredient list, and though Mexican chorizo is different, it’s equally delicious. Spanish chorizo is a hard, cured meat (think similar to a cured hard salami), and Mexican chorizo is a soft sausage-like meat, almost like a breakfast sausage patty if you broke it up into little bite-size pieces.

I love to use chorizo in a variety of ways: anything from breakfast dishes such as huevo con chorizo, to snacks such as queso fundido, to spicing up vegetables in dishes such as calabacitas rellenas. It’s also great as a topper to tostadas or sopes, and can be used to make fun little party appetizers like these chorizo and avocado cups with chipotle crema.

RELATED RECIPE: Huevo con chorizo breakfast tacos

I used a blend of three chiles to make my homemade chorizo slightly spicy and also some chopped onion and garlic to give it the right texture. The vinegar helps with giving the meat the signature crumble of Mexican chorizo.

This chorizo needs to be cured in the refrigerator for 4-6 days to allow the chiles and garlic to mellow, and for the vinegar to do its work on the texture.

Print
Chorizo Casero | Homemade Chorizo

Chorizo Casero | Homemade Chorizo

My chorizo recipe was recommended by the New York Times Diner's Journal in December 2011.

Ingredients

  • 1 pound ground pork
  • 2 cups of water (for soaking the chiles)
  • 4 chile guajillo
  • 3 chile de arbol
  • 1 chile ancho
  • 1/2 teaspoon Mexican oregano
  • 1/4 teaspoon black pepper
  • 1 1/2 teaspoon kosher salt
  • 2 quarter-inch thick slice of white onion (one slice will go in food processor; other will be finely chopped)
  • 7 large garlic cloves (reserve 2 for later)
  • 1 tablespoon apple cider vinegar
  • 2 tablespoons Nakano rice vinegar

Instructions

  1. Bring two cups of water to a boil and remove from heat. Tear off the chile stems and soak the chiles for at least an hour or until completely soft. When the chiles are soft, remove them from the water, drain, and discard all the water. Do not remove the seeds from the chiles.
  2. Place the chiles, oregano, salt, pepper, one quarter-inch thick slice of onion and five cloves of garlic into the food processor or blender. Run for 5-10 seconds. Add the apple cider vinegar and rice vinegar. Reseal top of food processor or blender and pulse until the mixture is a smooth paste.
  3. In a glass mixing bowl, add the ground pork and make a well in the middle of the meat. Add half of the chile mixture and gently work it into the meat. Add the second half and repeat.
  4. In the food processor add the two remaining garlic cloves and pulse a few times so that it's roughly chopped. Add to the meat and chile mixture.
  5. Finely chop the second quarter-inch thick slice of onion. Add to meat and mix well to incorporate.
  6. Transfer the chorizo to an airtight container or a plastic zippered bag and store in the refrigerator for four to six days. It needs that time to cure and for the seasoning to mellow out. If you eat it before curing it, it may taste too spicy or too salty, the garlic will be very potent and the vinegar will be strong. If you can bear to leave it alone for six days to cure, it's worth the wait.
  7. After a few days, some liquid will run off the meat, which is completely normal. You can dump it out when you notice it or you can leave it up until you're ready to cook the chorizo. Be sure to discard the liquid either way.
  8. When it's ready to be eaten, just heat a frying man over medium heat, add the chorizo and fry it up until it's crumbly and well-done. Drain over paper towels and use in your favorite dish.

Notes

You can refrigerate cooked or uncooked leftovers for a few days or freeze raw meat in an airtight container or plastic zippered bag for a few weeks.

3.1

https://theothersideofthetortilla.com/2011/12/chorizo-casera/

©2009-2015 theothersideofthetortilla.com

RELATED RECIPE: Trenza de huevo con chorizo

This post is part of a sponsored series to promote Mizkan cooking wines, vinegars and marinades. We also received samples of Mizkan’s Holland House, Nakano and World Harbor brand products and promotional material from Mizkan to assist in preparing the posts. All opinions and recipes in this series are our own.

Meat, Recipe, Sponsored, Staple Recipes #MizkanLatino, apple cider vinegar, cebolla, chile ancho, chile de arbol, chile guajillo, chorizo, Nakano rice vinegar, onion, vinagre, vinegar

Arrachera borracha con rajas de pimiento

5 · Aug 18, 2011 · 14 Comments

[youtube]http://www.youtube.com/watch?v=kEyhzmhA8SY[/youtube]

I’ve been experimenting in the test kitchen lately and coming up with some new recipes. Today I’m sharing my newest recipe for the #MizkanLatino cooking challenge, arrachera borracha con rajas de pimiento, or drunken skirt steak with grilled bell pepper strips. “Sabroso Grilling” was the theme for this challenge and the challenge ingredient was to use one of Mizkan’s World Harbors marinades, so I chose the Mexican-style fajita marinade….

Read More

Meat, Plato fuerte/Main dish, Recipe, Sponsored, Video #MizkanLatino, arrachera, beer, bell peppers, Bohemia, cerveza, chile ancho, chile powder, falda de res, flank steak, lime, limón, pimiento, skirt steak, World Harbors marinade

Mexican Chimichurri Marinated Flank Steak

4 · Jun 27, 2011 · 24 Comments

Who doesn’t love to grill? With the 4th of July coming up, I know that we’re going to be out on the patio all weekend to enjoy the sunshine while sipping on some limonada with friends, grilling up some cebollitas and this tangy new recipe I came up with for the #MizkanLatino cooking challenge.

José, Mr. Picky-Picky when it comes to me experimenting with new ingredients, said this dish both smelled and tasted fantastic! With his stamp of approval, you know it has to be good. A note about the use of jalapeños in this recipe: you can absolutely leave the seeds and veins in the jalapeño if you want to give your chimichurri a little kick. I removed them in the video so that the chimichurri wouldn’t be spicy, but would still have all the flavor of a jalapeño so that I could serve it to guests who were a little apprehensive about eating spicy food.

I used flank steak here (also known as falda de res) but you can substitute with another cut such as skirt steak (arrachera) if you like.

Be sure to check out the linky below throughout the week to see more videos and recipes from others participating in this challenge with me. You can also find out more about Holland House products on the Mizkan website.

[youtube]http://www.youtube.com/watch?v=UD-Ta0YKUS0[/youtube]…

Read More

Chiles, Comer Sano/Eat Healthy, Meat, MexMonday, Plato fuerte/Main dish, Recipe, Sponsored, Video #MizkanLatino, ajo, chimichurri, cilantro, cooking challenge, cooking wine, falda, falda de res, flank steak, garlic, Holland House, jalapeño, kosher salt, lime, limón, olive oil

MILANESAS

11 · Feb 21, 2011 · 4 Comments

[youtube]http://www.youtube.com/watch?v=l3MpWGncssw[/youtube]

Milanesas are a favorite in our house in part because they’re so easy to make. They’re great with beef, pork or chicken cutlets and the rest of the recipe never changes! Whenever I’m in a rut and not sure what to make for dinner and am short on time, this is usually my go-to recipe. The best part is that you can prepare the meat and dredge it the day before and just refrigerate overnight so all you have to do is cook them. Just be sure to separate each cutlet so they don’t get stuck together and store in an airtight container.

Served with lime wedges and a little salsa to garnish, our favorite way to eat milanesas is of course, as a taco. José also likes milanesas de puerco served with papas fritas. I like milanesas de pollo with rajas de chile poblano y cebolla. Really, there are lots of ways you can serve them, so be creative.

I typically use a little oil as possible – not in an attempt to be healthier because fried foods just aren’t healthy – but to keep the breaded cutlets as light as possible. If you use too much oil, it’s possible for them to get heavy and greasy. With less oil they stay lighter and, dare I say, a little less unhealthy because they’re not soaked in grease….

Read More

How To, Meat, Poultry, Recipe, Video

CROCK-POT COCHINITA PIBIL

64 · Jan 24, 2011 · 27 Comments

Cochinita pibil is a traditional dish from the state of Yucatán that’s cooked in an oven made inside a hole in the ground (called a pib). But did you know you can make a really good version of this dish in a slow-cooker?

When I found out that January was National Slow-Cooking Month, I knew exactly what recipe I was going to adapt for Crock-Pot cooking. I’ve always wanted to test my theory that cochinita pibil can be done in a slow-cooker, so the fact that it was a nationally recognized month-long culinary holiday-of-sorts was the perfect chance to take on the challenge.

How to make cochinita pibil in a slow-cooker or Crock-Pot via theothersideofthetortilla.com


Yes, we’ve posted a recipe here before for cochinita, but let me tell you why this one is different. We’re using a different cut of meat (boneless country-style pork ribs), an easy spice mix made from scratch (no achiote paste in brick-form here), and as with most slow-cooker recipes, you can set it and forget it, making it relatively hassle-free compared to the traditional method of making cochinita pibil.

If you’re making it for guests, you can still serve it wrapped in warm banana leaves to impress them. Just check out our original recipe for cochinita pibil for directions on how to heat the banana leaves so they’re pliable.

And finally, we’re not going to serve our cochinita pibil as a taco like you might expect–we’re going to serve them on tostadas.

This dish can also be served as panuchos by putting the refried black beans inside little tortillas, frying before adding the meat, salsa and any garnishes on top, but trust me when I say store-bought tostadas are going to save you a lot of time. Plus, this recipe is a bit healthier because we’re leaving the frying out. If you can’t find small tostadas or picaditas at your grocery store, you can make your own by either heating corn tortillas in the oven until they’re dry and crispy, or you can get the same result by cooking them longer on your comal.

But before we move on to the recipe, let’s talk a little about what a slow-cooker (or Crock-Pot) actually is so there’s no confusion because I often get asked if a slow cooker is the same as a pressure cooker. (The answer is no. In fact, they’re opposites.) A slow-cooker is a counter-top electric device that you plug in and usually has a removable glazed ceramic or porcelain pot, surrounded by a heat-conducting housing. They typically have two cooking settings: low or high, and a keep warm setting. Some of the more expensive slow-cookers have more options for controlling the heat as well as a timer with an automatic-shut off.

The point of a slow cooker is to cook things with steady low, moist heat which makes it ideal for soups, stews and cooking meats that you want to be fork-tender, but without all the fuss of watching it constantly. The lid of the slow cooker typically has a small vent in order to let some of the steam escape and can be removed during the cooking process to stir the ingredients if needed.

So now that you know the difference, let’s get slow-cooking.

What marinating the meat looks like:

Print
Crock-Pot Cochinita Pibil

Yield: 3 1/2 cups of meat

Use your Crock-Pot or slow-cooker for a no-fuss, easy-cleanup variation of a classic Yucatan favorite, cochinita pibil. Tip: Serve on mini tostadas for a perfect party-treat!

Ingredients

  • Meat and marinade:
  • 1 1/2 pounds country-style boneless pork ribs
  • 1 cup fresh lime juice (about 10 medium-large limes)
  • 3/4 cup fresh orange juice
  • 3 cloves garlic, crushed
  • 1/2 of a large red onion, cut into 1/4 inch slices
  • Spices:
  • 3 tablespoons white vinegar
  • 1 1/2 teaspoon kosher salt
  • 2 1/2 teaspoon ground achiote
  • 1/4 teaspoon freshly ground pepper
  • 1/2 tablespoon olive oil
  • 1 to 1 1/2 teaspoon whole Mexican oregano
  • Salsa:
  • 1/2 of a large red onion, sliced into small strips
  • juice of 1 large orange
  • juice of 2 large limes
  • 1 roasted habanero chile, finely chopped
  • For tostadas:
  • 1 package of small tostadas or picaditas
  • 1 cup refried black beans

Instructions

  1. THE NIGHT BEFORE: MARINATING THE MEAT - Start by squeezing the fresh lime juice and orange juice. Once you have the juice, put it in a medium to large glass bowl and add the crushed garlic. It's important to use glass rather than metal/stainless steel or plastic because glass is non-reactive and non-corrosive.
  2. Combine all the dry spices and mix well; then add vinegar and olive oil. Stir to incorporate the liquids and add to the glass bowl with the citrus juices and garlic. Stir well and add the pork to the bowl, making sure it’s completely covered by the juice. Cover and allow it to marinate overnight in the refrigerator.
  3. Making the salsa: Slice 1/2 of a large red onion into small strips and mix it with the juice of 1 orange and 2 limes. Roast one habanero on your comal or in a skillet, remove the stem (and seeds if you want to reduce some of the heat), and finely chop. Add the habanero to the salsa. Store in an airtight container in the refrigerator overnight.
  4. THE DAY OF: Slice the remaining half onion into quarter-inch thick slices and place them on the bottom of the crock-pot. Remove the meat and marinade from the refrigerator and place the meat over the onions. Pour all the juice over the meat.
  5. Place the lid on the crock-pot and cook on high for 5 hours (or on low for 8-9 hours). You should NOT rush and cook this recipe on high heat for half the time - it doesn't work that way! You'll end up with tough meat.
  6. You’ll know it’s finished cooking when you remove a piece of meat from the crock-pot and can shred it with a fork without much effort. Shred all the pork. Place the meat in a bowl and add a little juice from the Crock-Pot to keep the meat moist.
  7. Heat the tostadas in the oven at 200º F for a few minutes. Spread warm refried black beans on the tostadas. Add the shredded pork on top of the beans and spoon some of the habanero salsa and onions on top of the pork.
3.1

https://theothersideofthetortilla.com/2011/01/crock-pot-cochinita-pibil-panuchos-yucatecos/

©2009-2015 theothersideofthetortilla.com

Meat, Plato fuerte/Main dish, Recipe, Slow-Cooker recipes, Yucatán cebolla, cochinita pibil, crock-pot, habanero, slow-cooker, Yucatán

ENCHILADAS VERDES

2 · Dec 28, 2010 · 3 Comments

Last month at my cooking show at the Kenmore Live Studio where I made chilaquiles, I talked about the versatility of salsa verde. I can think of about a dozen uses for this sauce just off the top of my head, so when I make it, I usually make extra so that I can get a few different meals out of it. One of my favorite things to make with salsa verde is enchiladas.

This recipe is so easy to make; great whether you need to feed just a few or a whole family. A few weeks ago, I made these enchiladas for my suegro and he ate three helpings! I laughed and asked him whether they were that good or if he was very hungry and as he was about to take another bite, he said “both!” These are also a favorite of José’s.

If you want to make these vegetarian, you can substitute vegetable broth for the chicken broth in the salsa and fill them with cheese instead of chicken.

RECETA:

ENCHILADAS VERDES

FOR SALSA VERDE

  • A little over 1 pound of small tomatillos, husked & thoroughly washed
  • 3-5 serrano chiles (depending how spicy you like it), stems cut off and roughly chopped
  • 1-2 cloves of garlic
  • 1-2 slices of white onion
  • A pinch or two of salt to taste
  • 1-1 ¼ cup chicken broth or water

FOR THE ENCHILADAS

  • 3 cups shredded chicken (2 chicken breasts and some dark meat)
  • 6-7 oz (about ¾ cup) of shredded Chihuahua cheese
  • ½ cup crema Mexicana
  • A dozen corn tortillas
  • Some canola oil for frying the tortillas

To make the salsa:

First, husk and wash the tomatillos. Rinse them well in cool water.

Fill a pot with water (large enough to fit all the tomatillos) and bring to a boil. Put the tomatillos in and cook in the boiling water until the tomatillo flesh begins to get transparent. Using a slotted spoon, transfer the tomatillos to a blender. Add the onion, garlic and salt. Cut the stems off the serrano chiles and cut each chile into a few pieces so they’re easily chopped in the blender.

Start by adding 2 chiles to the blender with about ¾ of a cup of water or chicken broth and blend on high until smooth and the chiles and tomatillos are completely incorporated. Taste the salsa to see if it’s too hot; if it needs more chile, add them one at a time, blending & tasting the result until you are happy with the level of heat from the chiles. If it seems the salsa is not quite liquid enough, add another ¼ cup of water or chicken broth. The salsa will reduce slightly when cooked.

Pour blender contents into a saucepan and cook over medium heat until the salsa boils, occasionally stirring. Remove from heat.

For more on salsa verde, visit my original post on the topic.

You can either make a bone-in chicken breast from scratch or use a store-bought rotisserie chicken if you’re short on time. For bone-in chicken breast and chicken stock, you can just gently boil the chicken on the stove with a pinch or two of salt, a slice of onion and a small spring of cilantro or a few epazote leaves until the meat is cooked through. If you use a rotisserie chicken, buy one that’s low-sodium or barely seasoned. You can pour the juices from the container into a saucepan with a few cups of water and a chicken leg or two.

To make the enchiladas:

Preheat the oven to 350º F (177º C).

Heat a little bit of oil in a frying pan (just enough to coat the bottom of the pan) and lightly fry both sides of the tortilla. Each side will dome up when it’s ready to be turned. Drain on paper towels. Put a bit of the shredded chicken in the center of each tortilla and add a generous pinch of the shredded Chihuahua cheese. Roll them up and place seam-side down in a baking dish.

Spread the crema liberally over the top of the enchiladas and then ladle some salsa over them. Sprinkle the remaining cheese over the top and heat in the oven at 350º for 8-10 minutes to heat through. Then move to the top rack and broil on low until the cheese is completely melted and bubbly, with some brown spots. Remove from the oven. Using a spatula, transfer enchiladas to plates and finish with some extra salsa on top.

Yields 12 enchiladas. There will be some leftover salsa.

  • How do you like your enchiladas?

Plato fuerte/Main dish, Poultry, Recipe, Salsa, Staple Recipes ajo, basic chicken stock, caldo de pollo, canola oil, cebolla, chicken, Chihuahua cheese, chile serrano, crema Mexicana, enchiladas, garlic, onion, pollo, queso Chihuahua, tomatillo, tortilla

FILETE DE RES A LA CHIAPANECA

0 · Dec 2, 2010 · 3 Comments

During my last visit to Mexico, one rainy afternoon I spent several hours leafing through my suegra’s cookbooks looking for some new tricks and some family recipes.

After writing several recipes down, I decided to just use my phone to take a photo of each recipe card so that I could have all the recipes without all the work of writing them down. Plus, they’d be easy to access in the kitchen and as an added bonus, they’re in the original handwriting of whichever relative gave my suegra the recipe. Some of them were even typed on a typewriter!

A month or two ago, José discovered my little secret while browsing the photos on my phone and he was like a little kid opening presents on Christmas. Now he’s always stealing my phone when he’s hungry! Last week he was scrolling through the recipes looking for something different that I hadn’t yet attempted to make and he came across this recipe for filete de res a la Chiapaneca, or Chiapas-style steak. It’s another recipe of Tía Carola’s and it came with minimal instructions as usual. I had to modify the recipe slightly because on the first taste test of the salsa, José said it didn’t taste quite right. But this version I’m sharing here is super sabroso and sure to delight the whole family….

Read More

Chiapas, frijoles/beans, Meat, Mexico City, Plato fuerte/Main dish, Recipe, Salsa, Travel aceite, ajo, black beans, canola oil, chile pasilla, filet mignon, filete, frijoles negros, frijoles refritos, garlic, picaditas, queso Oaxaca, refried beans, Tía Carola, tomatillo, totopos, vegetable oil

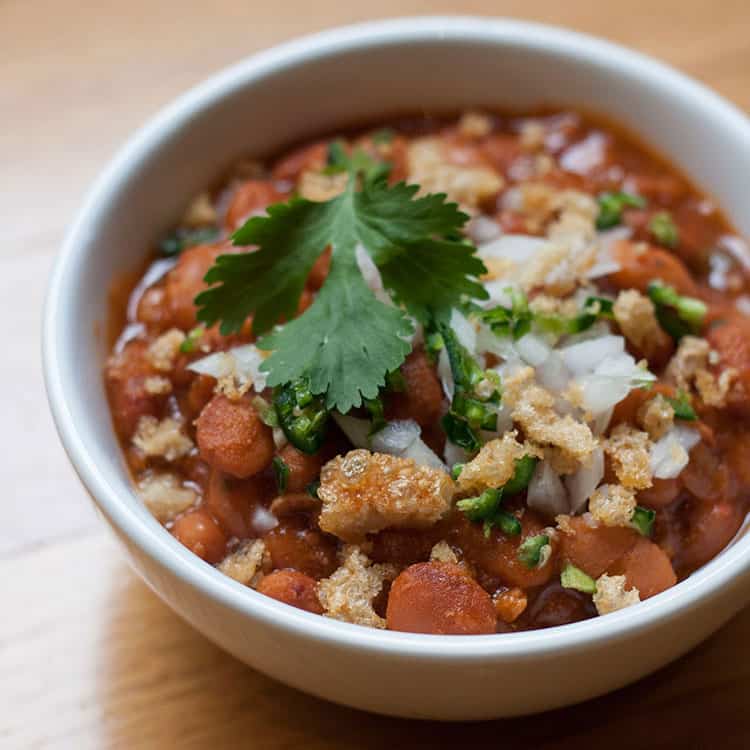
How to make frijoles charros

161 · Nov 8, 2010 · 18 Comments

Frijoles charros is one of my all-time favorite Mexican dishes.

For weeks, José had been bugging me to make his Tía Carola’s frijoles charros. Outside of El Charco de Las Ranas, his favorite taquería in Mexico City, Tía Carola’s frijoles charros are the only ones he has ever raved about.

How to make authentic Mexican frijoles charros - recipe via theothersideofthetortilla.com

Until the day I decided to make them.

When I asked for the recipe, it felt like I was playing “teléfono descompuesto” with at least three people – where something surely gets lost every time someone relays the message on to another person. José called his sister, who called his aunt; then his sister called him back and he translated the ingredients to me. Note that he only relayed the ingredient list and not the portions. And he only got a vague set of instructions. Apparently, Tía Carola is not exactly keen on lots of details and also hadn’t made this dish in at least 10 years. I’d be lying if I said I wasn’t a bit nervous about making this vaunted recipe with such a vague idea of what I was supposed to do.

I returned from the store with a big bag of pinto beans. José argued with me that I had bought the wrong beans because they were supposed to be frijoles bayos. I knew that, but couldn’t find them at the store so I settled confidently on a hand-sifted bag of carefully chosen pinto beans. I settled the argument with a quick google search that ended in my favor, which had me secretly feeling proud on the inside that I knew frijoles pintos and frijoles bayos were not the same, but often interchangeable because of their similarities in taste, color and texture ‑ especially in this recipe.

I knew when José argued with me about the beans that he was going to be a tough customer to please. I lit one of my San Judas Tadeo candles (the patron saint of lost causes and desperate situations) and hoped for a culinary Hail Mary with my limited instructions and the guesswork lying ahead. I was short on time with no room for mistakes since I was making the frijoles charros for lunch on a weekday and all I had as a backup were some emergency TV dinners in the freezer. Who could have ever imagined there could be so much pressure behind a pot of beans?

As I served the frijoles charros, my stomach was in knots. Would they live up to Tía Carola’s recipe? I waited for the verdict as he savored the first spoonful.

Resounding success! “Muy bien!” José said as he nodded and ate another spoonful – as if he had perhaps doubted that I could get the recipe down on the first shot with such vague instructions. I couldn’t blame him. After all, I hadn’t been quite sure I’d be able to pull it off either, to be honest. But three servings and a high-five later, I was convinced I had gotten it perfectly right. I’ve now been making this dish for years and it’s become a staple in my kitchen, especially during the fall and winter months.

frijoles pintos

You need an olla express (a pressure cooker) for this recipe. Like I’ve said many times before to those who’ve asked me, you don’t need to spend a lot of money on a fancy pressure cooker with lots of bells and whistles. I have a pressure cooker that I bought at a national household goods chain for $20 (less a 20% off coupon) that I’ve had for several years and it works perfectly fine. It’s the easiest, quickest way to make just about any kind of beans from scratch. It’s a shortcut even your abuelita would approve of – trust me.

One of the key ingredients in the flavoring of this recipe is Mexican beer, and to help you out in advance, here are a few brands I recommend: Victoria, Indio, Sol, Modelo, Bohemia, and Pacifico. In a pinch, you could also try Tecate or Corona. No matter where you live in the world, you should be able to get at least one of them!

This recipe is perfect as an appetizer, as a meal itself or as a side. It’s especially perfect in the fall and winter because it’s hearty and will keep you warm and full. And José will tell you: it’s even better the second day. That is, if you have any leftovers.

frijoles charros
Print

Frijoles charros

Prep 20 mins

Cook 1 hour

Total 1 hour, 20 mins

Author Maura Wall Hernandez

Yield 6-8 servings

Frijoles charros (cowboy beans) are a hearty, meaty Mexican dish that can be served as a main dish or a side.

Ingredients

  • 1 cup pinto beans (frijoles bayos can be substituted)
  • 5 cups water
  • 2 teaspoons powdered chicken bouillon (such as Knorr Suiza)
  • 5 strips of thick center-cut bacon
  • 4 ounces Mexican chorizo, cooked (I use pork, but you can also use beef)
  • 4 Roma tomatoes (known in Mexico as jitomate Saladet)
  • 4-5 serrano chiles
  • ½ of a large white onion, sliced
  • 1 clove of garlic (optional)
  • 1 cup (8 fluid ounces) Mexican beer
  • 1-2 small sprigs of cilantro
  • salt to taste

For garnish:

  • Finely diced white onion
  • Finely diced serrano chile
  • Crushed chicharrón (called pork cracklings in English)

Instructions

  1. Rinse your beans well and remove any broken pieces. Add the beans and chicken buillon to the pressure cooker and cover with the water. Close the lid and heat on high until the safety valve closes on the pot and the pressure gauge begins to rock gently and consistently (or if your pressure cooker doesn’t have a rocking gauge, follow the directions that came with the pot). Allow the beans to cook for 20-25 minutes.
  2. While the beans are cooking, remove the stems of the tomatoes and roast them under the broiler in the oven with the onion, chiles and optional garlic. Turn them to the other side when you notice them getting darkened. Remove from the broiler and set aside.
  3. On the stovetop, cook the bacon in a frying pan until it is moderately crispy. Remove from the pan and drain on paper towels. Tear the bacon into bite-sized pieces and set aside.
  4. Next, cook the chorizo over medium heat in a frying pan, making sure to break up the meat into small pieces. Be sure not to overcook the chorizo. Drain on paper towels if necessary.
  5. By this time, the beans should be halfway done. Remove the pot from the heat. If desired, you can gently alleviate the pressure by using an oven mitt to set the pressure gauge slightly off-kilter to allow steam to escape until the safety valve unlocks. Caution: it will be very hot and will burn you if you don’t protect yourself with an oven mitt. I like to also use a kitchen towel to catch the steam carefully in addition to wearing the mitt. If you’re not confident about trying this method, don’t worry – just let the pot sit after you’ve removed it from the heat until you hear the safety valve unlock. It will take a little longer that way, but if you’re at all nervous about safety because you’re a first-time pressure cooker user, just let it rest and cool on its own.
  6. Add the roasted tomatoes, chiles, onion and optional garlic into the blender and puree until completely smooth. Add torn bacon and chorizo to the blender and pulse blender until incorporated. The mixture will turn a shade of reddish-orange thanks to the chorizo.
  7. Open the pressure cooker once the safety valve has unlocked. You still should handle the pot carefully – using oven mitts, slowly open the pot facing away from you so any remaining steam escapes safely. There should still be a decent amount of liquid in the pot covering the beans. If not, add a little water until the beans are completely covered.
  8. Add the mixture from the blender to the pot and then the beer; stir once, throw the small sprig of cilantro on top and close the pot back up securely. Put it back on medium-high heat until the pressure gauge rocks gently and consistently again (it should not spin or spit liquid; if it does, the heat is too high). Reduce the heat just slightly and cook for another 25-30 minutes.
  9. Remove from heat and allow to cool using the same method as before. Once you open the pot, the beans are ready to be served; just add salt to taste.
  10. Garnish with finely diced white onion, serrano chile, crushed chicharrón and if desired, a few fresh cilantro leaves.

Notes

The cook time for this recipe is based on using a pressure cooker.

Cuisine Mexican


Cilantro for frijoles charros - recipe via theothersideofthetortilla.com


Meat, Most Popular, Plato fuerte/Main dish, Pork, Pressure Cooker Recipes, Recipe, side dishes chicharrón, chorizo, Tía Carola

Albóndigas en salsa chipotle

17 · Oct 12, 2010 · 19 Comments

Albóndigas are a simple Mexican comfort food, easy to make and even easier to eat. I always serve these Mexican meatballs in a tomato chipotle sauce. Some people like to make their albóndigas bigger so they can accommodate a whole egg filling on the inside. My husband only likes them without egg, so I finally learned this recipe from our family friend, Esmeralda. It’s an easy but traditional Mexican dish sure to please the whole family.

A classic recipe for albóndigas al chipotle, a Mexican meatball dish with a tomato-chipotle sauce. Recipe via theothersideofthetortilla.com.

This past weekend I had the pleasure of speaking at the Blogalicious Weekend conference at the Ritz-Carlton South Beach in Florida. I had an absolutely incredible time and was inspired by so many of the women I met.

The kind folks at Kenmore hosted a pop-up kitchen at the conference and invited me several weeks ago to do a cooking demo using their kitchen. There was one challenge: I had to choose a recipe that could be made only using small appliances.

I thought for several days about what I could make with only access to a blender, a convection toaster oven, a toaster, a stand mixer, an induction pad, a food processor, a coffee maker or teakettle and a slow cooker. It was a tough decision because I really wanted to make rajas con crema, but without a sink and an oven, I didn’t think I could pull it off.

A few weekends ago, my mom was foraging through my refrigerator looking for a snack and I ended up giving her some albóndigas (meatballs) over rice. She loved them so much that she gobbled up the last of what little was left in a Tupperware from a few nights before.

The next day at 7 a.m. – a Sunday – my mom called to tell me she’d been up all night thinking about albóndigas and that she needed my recipe so she could make them herself that day. Seldom in my life has my mom, who is an amazing cook, called me for a recipe – it’s always me calling her. That’s when I decided if they were good enough for mom to call me at 7 a.m. on a Sunday and risk waking me up on the one day a week that I like to sleep in, then the Blogalicious crowd would surely love this recipe, too. If you weren’t able to see it live in Miami, check out the video below of the cooking demo from start to finish.

A classic recipe for albóndigas al chipotle, a Mexican meatball dish with a tomato-chipotle sauce. Recipe via theothersideofthetortilla.com.

[youtube]http://www.youtube.com/watch?v=CGOeny70SdQ&feature=channel[/youtube]
…

Read More

Meat, Plato fuerte/Main dish, Recipe, Video arroz, black beans, Blogalicious, carne molida, cebolla, chipotle en adobo, egg, Esmeralda, frijoles negros, ground beef, huevo, jitomate, onion, pepper, pimiento, rice, sal, salt, tomatoes

Primary Sidebar

¡Bienvenidos!

Hi, I'm Maura Hernández. Welcome to my kitchen! I'm an award-winning food and travel blogger, recipe developer, and former journalist sharing my passion for all things Mexico. Married to a Chilango, I've traveled Mexico extensively over the last 15 years. Here, you'll find a mix of traditional and modern Mexican cooking, along with my advice on where to eat, stay and play on your visit to Mexico! READ MORE

New recipes, fresh travel tips + more

Delivered straight to your inbox!

Copyright © 2023 The Other Side of the Tortilla on the Cravings Pro Theme