• Skip to primary navigation
  • Skip to main content
  • Skip to primary sidebar

The Other Side of the Tortilla

  • HOME
  • ABOUT
    • CONTACT ME
    • FAQ
    • PRESS
    • PRIVACY POLICY
    • MEDIA KIT
    • ADVERTISE
  • RESOURCES
    • BOOKS
    • SHOP
    • INGREDIENTS
    • KITCHEN TOOLS
    • Thanksgiving
    • Mexican Christmas Traditions
  • RECIPES

Salsa

Roasted tomatillo and chile morita salsa

41 · Jul 12, 2017 · Leave a Comment

This easy roasted, smoky salsa made with tomatillos and chile morita is great on everything from tacos to scrambled eggs.

How to make easy roasted tomatillo and chile morita salsa

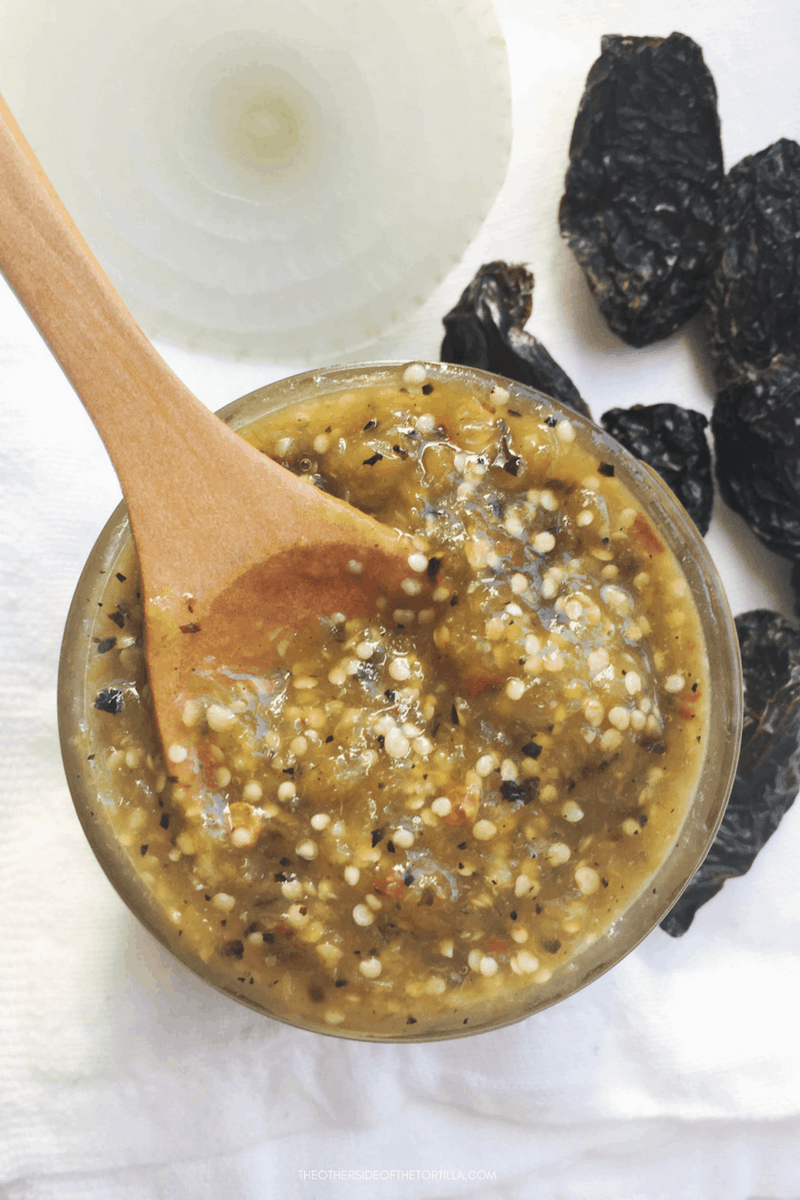
I’m all for simple salsas to dress up any meal of the day. Our dear friend Victor taught me how to make a version of this salsa when I was a newlywed and it’s one that I’ve continued making frequently ever since. You should use tomatillos milperos for this recipe. They’re a smaller variety of tomatillo, no bigger than about 1 to 1.5 inches in diameter. Anything much bigger than that is a larger variety of tomatillo. Tomatillos milperos have a more concentrated flavor, but are less acidic than the larger tomatillos, and have a slightly sweet, mellow taste when roasted. They’re called “milpero” because they’re often grown in the milpas in Mexico—the rows between corn planted in the cornfields.
…

Read More

Recipe, Salsa chile morita

How to make chipotle mayo

13 · Jan 19, 2015 · 2 Comments

Chipotle mayo is a condiment that you can easily make at home — so you can make it as mild or as spicy as you want! You probably already have all the ingredients at home, too.

How to make chipotle mayo. Directions via theothersideofthetortilla.com

Some condiments that are commonplace in Mexico, such as chipotle mayo, can be tough to find in mainstream grocery stores in the United States. Although I’ve always lived in cities where I had access to a Mexican grocery store, not all of them carry the brands I like, so I began making my own at home because I always have the ingredients handy anyhow. And considering it takes less than 10 minutes to whip up, I love that I can adjust how spicy it is with ease depending on my mood or what I plan to spread my chipotle mayo on….

Read More

Recipe, Salsa, Vegetarian/Vegetariano chile chipotle, chipotle en adobo

Salsa mexicana for one

3 · Sep 16, 2012 · 6 Comments

I often get asked how to make pico de gallo by my non-Mexican friends and, sometimes, new readers here. If you’re a regular reader or you know me personally, you probably know where this is going. In our house, pico de gallo is not the typical fresh salsa you may be familiar with, made of tomato, onion and cilantro. Instead, pico de gallo is a snack made with jicama, red onion, cucumber, orange, serrano chile, lime juice and sprinkled with Tajín. So, if you come to my house and ask for some pico de gallo, now you know what to expect.

What a lot of people call pico de gallo, though, we call salsa mexicana. And it’s extremely easy to make! To be clear, in most places if you ask for pico de gallo, the recipe below is what you’ll get. Since I’ve been asked several times in the last week how to make this easy, fresh salsa, I decided I might as well share it here for anyone who doesn’t already know how to make it. It’s easy to assemble in a big batch because you can play with the amounts of each ingredient to taste, but it’s a little more difficult to get it right when making a very small batch for only one or two people for a single meal, so I’ve provided directions below for the portions that I use.

A note, first: The chile is optional. I always put it in my salsa mexicana, but you don’t have to if you’re averse to spicy food. Or, if you want to go kind of half-way with it, you can cut a serrano chile open, remove the seeds and veins and chop it very finely. If you do that, you may still want to use half of the suggested portion and add more to taste as you can tolerate. But if you leave it out all together, just increase the amount of cilantro to taste. You’ll still have a nice salsa and no one will know anything is missing.

…

Read More

Comer Sano/Eat Healthy, Recipe, Salsa, Staple Recipes cebolla, chile serrano, cilantro, jitomate, lime, onion, tomato

Wordless Wednesday: Hot sauce heaven

0 · Jun 13, 2012 · 4 Comments

On a recent trip to the grocery store, I found myself all alone in the hot sauce aisle…

Yes, my grocery store has a salsa aisle. It’s a little slice of heaven, no?

  • What’s your favorite hot sauce?

Finding Mexico in Chicago, Salsa, Wordless Wednesday Mexisuper finds, Salsa

Wordless Wednesday: Salsa taquera

0 · Jul 27, 2011 · 15 Comments

I’ve always been fascinated by the different salsas served alongside my meal at any taquería. I ate all three of these (rojo con chile de árbol; verde con chile serrano y aguacate; cebolla roja con habanero) at my favorite taquería in Chicago, La Lagartija, this past weekend. They were just too pretty to not take a picture! One of the things I love about eating at taquerías is that each one has different salsas, and often the salsas are just as important as what goes in the taco.

  • What’s your favorite kind of salsa?

Finding Mexico in Chicago, Salsa, Wordless Wednesday Chicago, La Lagartija Taquería, Salsa, salsera

Salsa de tres chiles

1 · Jul 12, 2011 · 4 Comments

In case you missed it last week… check out our salsa de tres chiles on the Kenmore Genius Blog – the ultimate fresh, homemade dip for your tortilla chip! Warning: you may never be able to eat crappy restaurant “salsa” ever again after tasting this stuff. You know what I’m talking about – that runny, watery, often bland mess of tomatoes, onion and jalapeños they serve at chain restaurants. You’ll have to visit the Genius Blog for the full recipe with instructions, but here’s a sneak peek of the video:

[youtube]http://www.youtube.com/watch?v=qjYHU9woZ1s[/youtube]

  • Give this post a Facebook “Like” or a +1 on Google+ if you pledge to never eat bad salsa again!
Disclosure: I am compensated for my posts on the Genius Blog and provided with Kenmore small appliances to test but all my recipes and opinions, about the appliances and otherwise, are my own.

Chiles, How To, Kenmore Genius Blog, Recipe, Salsa, Sponsored, Video ajo, cilantro, food processor, garlic, jitomate, Kenmore, Kenmore Genius Blog, Salsa, tomatoes, tortilla chips, totopos

ENCHILADAS VERDES

2 · Dec 28, 2010 · 3 Comments

Last month at my cooking show at the Kenmore Live Studio where I made chilaquiles, I talked about the versatility of salsa verde. I can think of about a dozen uses for this sauce just off the top of my head, so when I make it, I usually make extra so that I can get a few different meals out of it. One of my favorite things to make with salsa verde is enchiladas.

This recipe is so easy to make; great whether you need to feed just a few or a whole family. A few weeks ago, I made these enchiladas for my suegro and he ate three helpings! I laughed and asked him whether they were that good or if he was very hungry and as he was about to take another bite, he said “both!” These are also a favorite of José’s.

If you want to make these vegetarian, you can substitute vegetable broth for the chicken broth in the salsa and fill them with cheese instead of chicken.

RECETA:

ENCHILADAS VERDES

FOR SALSA VERDE

  • A little over 1 pound of small tomatillos, husked & thoroughly washed
  • 3-5 serrano chiles (depending how spicy you like it), stems cut off and roughly chopped
  • 1-2 cloves of garlic
  • 1-2 slices of white onion
  • A pinch or two of salt to taste
  • 1-1 ¼ cup chicken broth or water

FOR THE ENCHILADAS

  • 3 cups shredded chicken (2 chicken breasts and some dark meat)
  • 6-7 oz (about ¾ cup) of shredded Chihuahua cheese
  • ½ cup crema Mexicana
  • A dozen corn tortillas
  • Some canola oil for frying the tortillas

To make the salsa:

First, husk and wash the tomatillos. Rinse them well in cool water.

Fill a pot with water (large enough to fit all the tomatillos) and bring to a boil. Put the tomatillos in and cook in the boiling water until the tomatillo flesh begins to get transparent. Using a slotted spoon, transfer the tomatillos to a blender. Add the onion, garlic and salt. Cut the stems off the serrano chiles and cut each chile into a few pieces so they’re easily chopped in the blender.

Start by adding 2 chiles to the blender with about ¾ of a cup of water or chicken broth and blend on high until smooth and the chiles and tomatillos are completely incorporated. Taste the salsa to see if it’s too hot; if it needs more chile, add them one at a time, blending & tasting the result until you are happy with the level of heat from the chiles. If it seems the salsa is not quite liquid enough, add another ¼ cup of water or chicken broth. The salsa will reduce slightly when cooked.

Pour blender contents into a saucepan and cook over medium heat until the salsa boils, occasionally stirring. Remove from heat.

For more on salsa verde, visit my original post on the topic.

You can either make a bone-in chicken breast from scratch or use a store-bought rotisserie chicken if you’re short on time. For bone-in chicken breast and chicken stock, you can just gently boil the chicken on the stove with a pinch or two of salt, a slice of onion and a small spring of cilantro or a few epazote leaves until the meat is cooked through. If you use a rotisserie chicken, buy one that’s low-sodium or barely seasoned. You can pour the juices from the container into a saucepan with a few cups of water and a chicken leg or two.

To make the enchiladas:

Preheat the oven to 350º F (177º C).

Heat a little bit of oil in a frying pan (just enough to coat the bottom of the pan) and lightly fry both sides of the tortilla. Each side will dome up when it’s ready to be turned. Drain on paper towels. Put a bit of the shredded chicken in the center of each tortilla and add a generous pinch of the shredded Chihuahua cheese. Roll them up and place seam-side down in a baking dish.

Spread the crema liberally over the top of the enchiladas and then ladle some salsa over them. Sprinkle the remaining cheese over the top and heat in the oven at 350º for 8-10 minutes to heat through. Then move to the top rack and broil on low until the cheese is completely melted and bubbly, with some brown spots. Remove from the oven. Using a spatula, transfer enchiladas to plates and finish with some extra salsa on top.

Yields 12 enchiladas. There will be some leftover salsa.

  • How do you like your enchiladas?

Plato fuerte/Main dish, Poultry, Recipe, Salsa, Staple Recipes ajo, basic chicken stock, caldo de pollo, canola oil, cebolla, chicken, Chihuahua cheese, chile serrano, crema Mexicana, enchiladas, garlic, onion, pollo, queso Chihuahua, tomatillo, tortilla

Cooking Combat at the Kenmore Live Studio: Chilaquiles

0 · Dec 27, 2010 · 10 Comments

Back in November, I did a cooking show with a live studio audience at the Kenmore Live Studio in Chicago. It was so much fun, I can’t wait to do another! For those who may have missed the show in person or couldn’t watch the live stream online, Kenmore was kind enough to put the show on YouTube so I could share with all of you.

¡Buen provecho!

[youtube]http://www.youtube.com/watch?v=S_8wf4HcK-Y[/youtube]

  • You can find my full recipe for chilaquiles verdes here.

Chiles, Eventos/Events, How To, MexMonday, Plato fuerte/Main dish, Recipe, Salsa, Video Chicago, Chilam Balam, chilaquiles, Chuy Valencia, Kenmore, Kenmore Live Studio, live event, Mexico Tourism Board

FILETE DE RES A LA CHIAPANECA

0 · Dec 2, 2010 · 3 Comments

During my last visit to Mexico, one rainy afternoon I spent several hours leafing through my suegra’s cookbooks looking for some new tricks and some family recipes.

After writing several recipes down, I decided to just use my phone to take a photo of each recipe card so that I could have all the recipes without all the work of writing them down. Plus, they’d be easy to access in the kitchen and as an added bonus, they’re in the original handwriting of whichever relative gave my suegra the recipe. Some of them were even typed on a typewriter!

A month or two ago, José discovered my little secret while browsing the photos on my phone and he was like a little kid opening presents on Christmas. Now he’s always stealing my phone when he’s hungry! Last week he was scrolling through the recipes looking for something different that I hadn’t yet attempted to make and he came across this recipe for filete de res a la Chiapaneca, or Chiapas-style steak. It’s another recipe of Tía Carola’s and it came with minimal instructions as usual. I had to modify the recipe slightly because on the first taste test of the salsa, José said it didn’t taste quite right. But this version I’m sharing here is super sabroso and sure to delight the whole family….

Read More

Chiapas, frijoles/beans, Meat, Mexico City, Plato fuerte/Main dish, Recipe, Salsa, Travel aceite, ajo, black beans, canola oil, chile pasilla, filet mignon, filete, frijoles negros, frijoles refritos, garlic, picaditas, queso Oaxaca, refried beans, Tía Carola, tomatillo, totopos, vegetable oil

CHILAQUILES VERDES

29 · Nov 22, 2010 · 15 Comments

Chilaquiles are a staple in my house – great for any meal: breakfast, lunch or dinner. When making them for breakfast, I serve an egg (fried or scrambled) on top; for lunch and dinner I usually add shredded chicken, but that can be left out if you’re serving it to a vegetarian. Whenever I go to a potluck dinner or any kind of event where I have to bring a dish, this is my tried and true recipe that always disappears quickly once served and the guests always end up calling me for the recipe the day after. And, ahem… chilaquiles are also known as the quintessential Mexican cure for a hangover.

RELATED RECIPE: How to make salsa verde from scratch

Chilaquiles verdes #recipe from theothersideofthetortilla.com #mexicanfood #comidamexicana

RELATED RECIPE: Baked taquitos with avocado salsa verde

I recently made my famous chilaquiles verdes for my Salsa Showdown cooking show at the Kenmore Live Studio and they were a huge hit. A lot of people from the audience came up to me after the show to say that they were impressed with not only the taste of the dish, but also how simple it was to prepare and that they felt confident they could make it at home. That’s always my goal here ­– to teach you recipes and break them down so you feel comfortable making them on your own. I hope you’ll try my chilaquiles, and if you do, please leave a comment below to let me know how you liked them!

RELATED RECIPE: Tacos de longaniza en salsa verde

One of the great things about the salsa verde for my chilaquiles is that it’s a very versatile salsa that can also be used for enchiladas as well as a few other dishes. Be sure to check back later this week for my recipe for enchiladas verdes….

Read More

Chiles, Plato fuerte/Main dish, Recipe, Salsa, Staple Recipes "serrano chile", ajo, basic chicken stock, chicken, chile serrano, crema Mexicana, garlic, Kenmore, Kenmore Live Studio, onion, pollo, queso cotija, tomatillo, tortilla chips

The Salsa Showdown is tomorrow! And we’ve got a {GIVEAWAY}!

0 · Nov 18, 2010 · 8 Comments

I’ve been receiving lots of encouragement here on the blog, on our Facebook fan page, via Twitter and email from all of you about my Salsa Showdown at the Kenmore Live Studio! Thanks for all your support!

Don’t forget: the showdown starts tomorrow night at 7 p.m. CST! You can attend in person in Chicago or watch from home live over the internet via the Kenmore Facebook fan page’s Live Studio tab. Watch our promotional video for the show and click on the Kenmore Live Studio button below the video to reserve your free tickets to attend the show in person tomorrow. We had lots of fun shooting the promo video, and I assure you that Chuy’s very nice despite all the tough-guy acting in the video. And if you come to the show, please introduce yourself afterward! I love meeting fans of The Other Side of The Tortilla!

No chefs were harmed in the filming of this video.

[youtube]http://www.youtube.com/watch?v=ZXKMxmyWDvc[/youtube]

To reserve your FREE ticket and get details with the studio address and directions, please click the Live Studio button below:

{GIVEAWAY/SORTEO}

And, we’ve got a very special giveaway this month!

Head over to our Facebook fan page and click “LIKE” for a chance to win a 2011 culinary calendar from our good friends at Muy Bueno Cookbook. The calendar, beautifully photographed by Jeanine Thurston, has a sneak preview of what will be in Muy Bueno’s cookbook, which I’m hearing will be out later next year. We’ll be posting some instructions on Facebook on how to win starting today. We’ll choose one lucky fan of The Other Side of The Tortilla as a winner once we hit 250 fans, so hurry and tell your friends about us!


Muy Bueno has partnered with The Denver Foundation to donate a portion of the proceeds from each calendar sale to their Strengthening Neighborhoods (SN) program. It’s a grant program that helps residents in 10 struggling Denver neighborhoods improve their communities “from the inside out.” The Grants help pay for resident leadership training, and community projects such as food pantries, tutoring programs, neighborhood gardens and school safety patrols. They have also helped with park and school cleanup, among other projects. If you are interested in learning more about this innovative program, please visit their website at www.denverfoundation.org and click on Strengthening Neighborhoods.

You can also try your hand at winning a calendar through Muy Bueno’s site and submitting a recipe. If you win, they’ll also photograph your recipe and post it on their blog.

  • ¡Suerte! Let me know what you think of the video in the comments.

Cultura/Culture, Eventos/Events, Salsa, Sorteo/Giveaway, Video Chicago, Chilam Balam, Chuy Valencia, Kenmore, Kenmore Live Studio, Muy Bueno Cookbook

COCHINITA PIBIL

5 · Sep 6, 2009 · 2 Comments

taco de cochinita pibil

Earlier this summer, I found myself searching every ethnic food aisle and every Mexican grocery store in Chicago for Chata-brand canned Cochinita Pibil. Having had it before, I knew it wasn’t as good as the real thing but I was yearning for that delicious achiote-flavored pork. Sadly, it was nowhere to be found. In a moment of desperation, I even searched the internet to see if I could order it from somewhere—finding out I was going to have to pay nearly $10 for a 14-ounce can, plus shipping.

All I could think about was the last time I’d eaten cochinita pibil in Mexico. After a big Christmas celebration with our extended family in Mexico City, we took a trip to Cuernavaca to ring in the new year with my husband’s parents and sister. We spent our vacation playing Mexico City Monopoly (with properties like Xochimilco and Chapultepec instead of Park Place and Broadway) and endless hours of domino. Laughter and shouts of “tramposo!” could be heard any time it was suspected that José was cheating…which was often, because he always likes to win.

On our way back to Mexico City, we stopped at a Yucatecan restaurant called El Faisán, where my suegros often visit after spending a weekend with friends in Cuernavaca. It was the first time both José and I had been there.

I know if El Faisán wasn’t as authentic as anything you’d eat in Mérida, my family wouldn’t eat there. They suggested I try the queso relleno which had a picadillo-style mixture incorporated into the cheese; it’s a favorite of one of our tias. My cuñada ordered sopa de lima and shared it with me. But what pleased my palate the most was an order of three little tacos de cochinita pibil. In fact, we ended up asking for three orders, and there was a mad scramble to get more than one little taco each. Paired with a tall, ice-cold glass of horchata to drink (another one of my favorite things), I was in little piggy heaven.

José was skeptical when I ambitiously said I was going to make cochinita. “In a regular oven?” he said, “it’s gonna be yucky.” In the Mayan language, “pib” means an underground pit for cooking, and that’s the traditional way to make cochinita pibil. Obviously that would be difficult to accomplish living on the sixth floor of a condo building in downtown Chicago, where we have no backyard. But when all was said and done and he tasted his first little taco, he gave me his standard stamp of approval—two thumbs up—and his blessing to make it again.

chile habanero
chile habanero

RECETA:

SALSA DE HABANERO Y CEBOLLA

  • 5 habanero peppers, roasted and finely chopped
  • Juice of  ½ an orange
  • Juice of 2 limes
  • 1 medium red onion, finely chopped
  • 2 tsp white vinegar

Roast habaneros in a skillet on medium heat until they start to get a few dark spots. Cut top off the pepper and discard stem. Finely dice the habaneros.

Mix the diced habaneros with the chopped onion in a bowl (or directly in the container you intend to store the salsa in, preferably in a glass jar). Pour juices over the habaneros and onions and then add the vinegar. Toss lightly to moisten and refrigerate for at least 4 hours before serving. Keeps refrigerated for about 5 days.

COCHINITA PIBIL

  • 3 lbs pork shoulder, cut into large stew-sized chunks
  • 2 large hojas de platano (banana leaves; if you can’t find them fresh, you can usually find them in the freezer section with other ethnic foods. My grocery store carries Goya brand frozen banana leaves)
  • A roasting pan
  • Aluminum foil, preferably heavy duty

Marinade:

  • 100 grams achiote paste (one box, also called annato seed paste)
  • 1 ½ cups fresh squeezed orange juice
  • 2 cups fresh squeezed lime juice
  • 4 cloves of garlic, crushed
  • A big pinch of salt
  • A little freshly ground pepper if desired
limones, achiote 7 naranjas
limones, achiote y naranjas

Cut achiote paste (comes in a block) into small chunks. Put into food processor with orange and lime juices to break up the paste and fully incorporate into the juice. Add the garlic, salt & pepper to the juice.

Pour into a gallon-sized Ziploc bag and add the chunks of pork. Remove air and seal the bag. Place the sealed bag in a large bowl and refrigerate overnight (about 12 hours).

In the morning, remove the meat from the juice and reserve the juice. You can put the meat and the juice back into the refrigerator until you’re ready to start cooking.

To prepare the banana leaves, turn your stove burners on low heat and place the leaves over the flames. You need to heat the leaves enough so they are pliable, but you don’t want them to cook and turn brown. The leaves will turn a brighter green when they’re heated through.

Heat the oven to 325 degrees.

cochinita pibil before cooking
cochinita pibil being wrapped in banana leaves before cooking

In a roasting pan, place the banana leaves one over the other like a cross. Transfer the meat directly into the pan on top of the banana leaves. Pour about half of the reserved juice over the meat—the juice will help steam the meat so it becomes very tender. Gently fold the banana leaves over the meat, being careful not to rip them but so that the meat is completely enclosed within the banana leaves. Cover the roasting pan tightly with two pieces of foil. It’s important that steam won’t escape, so make sure the foil is really secure.

Place on the middle rack of the oven, once it reaches 325 degrees. Cook for about 2 ½ hours, or until meat is tender enough to shred gently with a fork.

Shred all the meat.

The meat can be served as a main dish itself, with side dishes such as fried plantains, black beans or rice, and as tacos or on panuchos (smaller, fried tortillas, with refried black beans in the middle). If you’re going to make them as tacos, spread refried black beans on the tortilla and then place the meat on top of the beans. Garnish with salsa de habanero y cebolla.

Yields 4 servings (3 tacos each).

Chiles, main dishes, Meat, Salsa, Yucatán achiote, habanero, pork, Salsa, taco, Yucatán

SALSA VERDE (Cooked and Raw)

22 · Aug 30, 2009 · 9 Comments

Tomatillos GAL
tomatillos milperos

Salsas are the lifeblood of just about every Mexican dish. They can be cooked or raw, made in the blender or in a molcajete. Salsa can make or break any dish, add a special dimension of flavor or even make a dish edible (you wouldn’t eat chicharrón without cooking it in salsa to soften the dried meat).

The simple combination of tomatoes (jitomate or tomatillos/red or green), chiles (of any variety) and other ingredients like onion, garlic and spices is essential to many traditional dishes in Mexican cuisine. Salsa verde is certainly a staple in my house, whether it’s cooked and used for guisados like chicharrón en salsa verde, or raw salsa used for garnishing tacos.

You’ll notice this same cooked salsa recipe will be used over and over again in a number of dishes you’ll read about here and I’ll reference back to it often and sometimes modify it (for example, when making chilaquiles, I substitute fresh chicken stock in place of water).

In Mexico, we’ve eaten similar recipes to mine at many of our favorite restaurants, though some places use epazote in their cooked salsa (an ingredient I don’t use). In Chicago, we haven’t found a place that makes salsa verde the way we like it—or anywhere near it, really. Because of this, we sometimes order take out from our favorite Mexican restaurants and bring it home to eat it with our own homemade salsa.

Chile Serrano WEB
chiles serranos


Print
Salsa verde (cooked)

Prep Time: 10 minutes

Cook Time: 15 minutes

Total Time: 25 minutes

Salsa verde (cooked)

How to make Mexican cooked green salsa.

Ingredients

  • A little over 1 pound of small (milpero) tomatillos, dehusked & thoroughly washed
  • 3-6 serrano chiles (depending how spicy you like it; start with less and add them to increase heat), stems cut off
  • 1-2 cloves of garlic
  • 2 1/4-inch slices of white onion
  • A big pinch of Kosher salt

Instructions

  1. First, remove the husks and wash the tomatillos well. You’ll notice they’re sticky, which is a sign of ripeness, and probably slightly dirty under the husk. Sometimes I find that warm water isn’t enough, and I use a few drops of dish soap diluted in a bowl of warm water. Then I put the husked tomatillos in the bowl and gently rub each one in the slightly soapy water to remove the dirt and sap. Rinse them well in cool water to remove any soap residue.
  2. Fill a pot with water (large enough to fit all the tomatillos) and bring to a boil. Put the tomatillos in and cook in the boiling water until the tomatillo flesh begins to get transparent.
  3. Using a slotted spoon, transfer the tomatillos to a blender. Add the onion, garlic and salt.
  4. Cut the stems off the serrano chiles and cut each chile into a few pieces so they’re easily chopped in the blender. Start by adding 2 chiles to the blender with about ¾ of a cup of water and blend on high (liquify or puree) until smooth and the chiles and tomatillos are completely incorporated. Taste the salsa to see if it’s too hot; if it needs more chile, add them one at a time, blending & tasting the result until you are happy with the level of heat from the chiles.
  5. If it seems the salsa is not quite liquid enough, add another ¼ cup of water. The salsa will reduce slightly when cooked.
  6. Pour blender contents into a saucepan and heat over medium flame until the salsa boils, occasionally stirring. Remove from heat and allow to cool before storing in an airtight container in the refrigerator.

Notes

Stores well in the refrigerator in an air-tight container for about 10 days.

3.1
https://theothersideofthetortilla.com/2009/08/salsa-verde/
©2009-2015 theothersideofthetortilla.com

Tip: for extra flavor with salsa verde cocida, you can also add 2 strips of chicharrón (with meat still attached) to season the salsa. You should add the chicharrón during the end stage when you cook the salsa until it boils for a few minutes, then remove from heat and allow to come to room temperature before storing to infuse the chicharrón flavor. This flavor infusion method only works with the cooked salsa.

Print
Salsa verde cruda (raw green tomatillo salsa)

Prep Time: 15 minutes

Salsa verde cruda (raw green tomatillo salsa)

How to make Mexican salsa verde cruda (raw tomatillo green salsa)

Ingredients

  • A little over 1 pound of small (milpero) tomatillos, dehusked & thoroughly washed
  • 3-6 serrano chiles (depending how spicy you like it; start with less and add them to increase heat), stems cut off
  • 1-2 cloves of garlic
  • 2 1/4-inch slices of white onion
  • A big pinch of Kosher salt

Instructions

  1. First, remove the husks and wash the tomatillos well. You’ll notice they’re sticky, which is a sign of ripeness, and probably slightly dirty under the husk. Sometimes I find that warm water isn’t enough, and I use a few drops of dish soap diluted in a bowl of warm water. Then I put the husked tomatillos in the bowl and gently rub each one in the slightly soapy water to remove the dirt and sap. Rinse them well in cool water to remove any soap residue.
  2. Put the raw tomatillos directly into the blender with all other ingredients. Add the chiles to taste, starting with 2 and adding more if necessary. If it's too dry, add a few tablespoons of water to the ingredients and blend well until smooth.
  3. Serve immediately and store any leftovers in an air-tight container in the refrigerator for up to 3 days.

Notes

Stores in an air-tight refrigerated container for up to 3 days.

3.1
https://theothersideofthetortilla.com/2009/08/salsa-verde/
©2009-2015 theothersideofthetortilla.com

  • What do you do differently in making your salsas verdes or where is your favorite place to eat a dish that includes salsa verde?

Chiles, Salsa, Staple Recipes ajo, cebolla, chile serrano, garlic, onion, tomatillo

Primary Sidebar

¡Bienvenidos!

Hi, I'm Maura Hernández. Welcome to my kitchen! I'm an award-winning food and travel blogger, recipe developer, and former journalist sharing my passion for all things Mexico. Married to a Chilango, I've traveled Mexico extensively over the last 15 years. Here, you'll find a mix of traditional and modern Mexican cooking, along with my advice on where to eat, stay and play on your visit to Mexico! READ MORE

New recipes, fresh travel tips + more

Delivered straight to your inbox!

Copyright © 2023 The Other Side of the Tortilla on the Cravings Pro Theme