


These banana chia popsicles are an easy homemade summer treat packed with nutrition and very little added sugar.
During the summer, I always want paletas for dessert whenever possible because, well, it's typically REALLY HOT in the part of Los Angeles where we live. I very rarely buy popsicles in the grocery store because they have a lot of added sugar, and if I'm going to be eating them daily, I need to make healthier choices. Plus, I have a reputation to uphold as the queen of paletas!
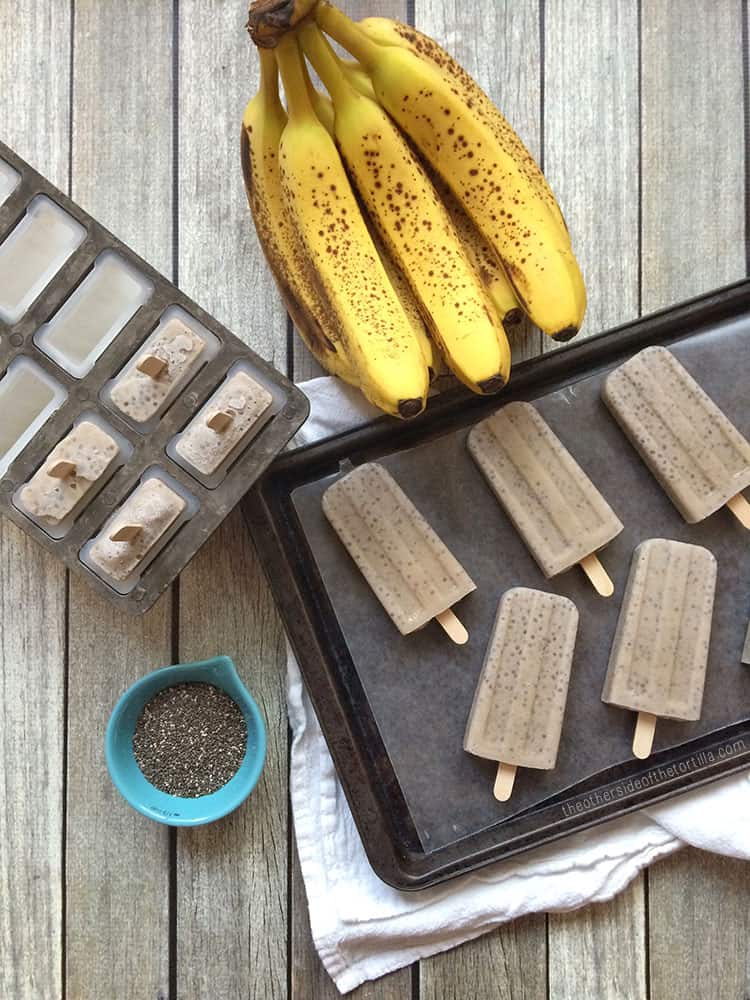
Whenever I buy too many bananas (which is basically always) and they start to get spots and are too ripe, I have to get creative with how to use them quickly. So I came up with this frozen treat version of a refrigerated banana chia pudding that I like to make when I'm trying to eat healthier. They're not overly sweet or too banana-y, they're very low-fat and not many calories per serving either (for the record, one serving is one popsicle). As you probably know, bananas are packed with potassium and Vitamin C as well as fiber and some other nutrients. Most of the sweetness in this recipe comes from the natural sugar in the bananas. Of course, if you like your popsicles on the sweeter side, you can always add a little extra sugar to the recipe if you want.
RELATED RECIPE: Coconut chia pudding
Chia seeds are an excellent source of fiber, Omega-3 fatty acids, and they even have some protein, too. They've been consumed for centuries, including by the Mayans and Aztecs. Chia seeds are a low-calorie super food and also contain a good amount of Vitamins B1, B2 and B3, in addition to zinc and potassium. In present-day Mexico, you’re most likely to notice chia seeds floating in an agua fresca, or perhaps in a chia pudding, which has a similar consistency to tapioca pudding.
For this recipe, the bananas should be not only darker yellow, but also have some brown spots. Green or light yellow bananas can taste sour or starchy sometimes, so you want them to be slightly over-ripe so they’ll taste sweet and have a smooth texture that doesn’t feel sticky or starchy.
Tip: When you've got lots of bananas that are quickly ripening or are over-ripe, slice them and freeze them on a small cookie sheet, then transfer to a freezer-safe plastic bag. I most often use them like this for smoothies (and the blender can handle small slices rather than big chunks of banana much better). It's the best way to avoid wasting bananas, and just a few minutes of prep work makes it very convenient to use once frozen.
And if you're into eating organic bananas, I find the best deals for those can be had at Costco.
RELATED RECIPE: Vegan avocado pudding pops
This banana chia popsicle recipe is gluten-free, dairy-free and vegan-friendly. If you leave out the added sugar, the recipe also becomes paleo and whole30-friendly.
One note about the sugar used in this recipe — I use Zulka Morena pure cane sugar in my kitchen; it's a Mexican brand that is non-GMO verified and is processed in a vegan-friendly way. You can substitute your preferred sugar 1:1, such as refined white sugar or coconut sugar (which has more of an unrefined, molasses-quality taste) but please take note that if you prefer to use a liquid sweetener such as agave nectar, it can change the consistency and taste of my recipe.

Ingredients
- 2 cups coconut milk, divided
- 3-4 tablespoons Zulka morena sugar
- ¼ cup chia seeds
- 2 ½ over-ripe, spotted bananas
Instructions
- In an airtight jar (I use a Mason jar), add 1 cup coconut milk, 3-4 tablespoons sugar and ¼ cup chia seeds. Shake the jar gently to incorporate all ingredients and make sure the chia seeds are wet.
- Allow the jar to sit undisturbed for about an hour so the chia seeds absorb the coconut milk.
- In a blender or food processor, add 1 cup coconut milk and 2 ½ over-ripe, spotted bananas. Blend on high until completely smooth.
- Add the coconut milk and chia seed mixture and pulse the blender a few times to distribute the chia seeds. Remove from the blender and stir with a spoon if necessary to ensure the chia seeds are evenly distributed.
- Pour into popsicle mold, add sticks and freeze for at least 8 hours.
- To remove from the mold, turn the mold sideways and run lukewarm water from the faucet over the tops of the popsicle mold for a minute. They should begin to slide out easily without melting.
Notes
Most of the one hour of prep time is inactive while you wait for the chia seeds to absorb the coconut milk and sugar. Active prep time is about 10 minutes.
RELATED RECIPE: Vegan banana cacao smoothie
5


lisa says
Oh my yum! Sharing, from your LBC friend.
Jenelle says
what kind of coconut milk do you use? Some are thicker than others. This sounds delicious.
Maura Wall Hernandez says
Jenelle, I use shelf-stable coconut milk (usually comes in a Tetra pak; brands such as Coconut Dream, So Delicious, etc) because it has a thinner consistency.