


What are sugar skulls and why are they used to decorate for Day of the Dead?
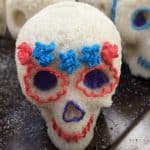
One of the most common decorations on altars for Day of the Dead is the sugar skull. Decorated with colorful icing, foils and other adornments—often including the names of loved ones who have died—sugar skulls symbolize the departed souls to which the altar pays homage.

You might not know how easy they are to make; they just require a little time (drying overnight) and patience (decorating with royal icing). All you need to make your own sugar skulls is a plastic mold, sugar, meringue powder and water. I've put together a detailed tutorial with photos so you can see how easy it is!
You can even do this project with the kids—but be sure to use a drop cloth in case they make a mess with the sugar.
What to buy to make your own sugar skulls for your Day of the Dead altar
I used mostly Wilton products because they're high quality, easy to get and easy to use. In the video, you can see the Wilton disposable decorating bags, reusable couplers, round decorating dip, meringue powder and icing colors.
The sugar I used to make the skulls in the photos was provided by Zulka, my favorite brand of non-GMO Mexican cane sugar. You can also use any kind of plain white sugar, as shown in the video above.
If you do not already own a mold, you should try to buy it as far advanced as possible, as the closer we get to the holiday, they typically sell out online.
Don't forget that the molds you buy need to have both the front and back of the skull if you want them to stand up properly on your altar.
You'll need:
- Wilton Meringue Powder
- Wilton Icing Colors (8-count)
- Wilton Disposable 16-inch Decorating Bags
- Small Sugar Skull Molds, Large Sugar Skull Molds
Preparing the sugar, filling the molds, and drying your sugar skulls
Mix the sugar and meringue powder until completely incorporated. Add the water and stir until the sugar has a consistency similar to slightly wet sand.

Once your sugar has reached the wet sand consistency, you can start filling your molds. Spoon into each half of the mold, pressing tightly to pack the sugar mixture. Level the back so it's flat. Hold one hand over the bottom end of the skull mold when pressing into the mold so the sugar doesn't spill out.

Allow your sugar skulls to dry overnight until completely firm. Pick them up off the baking sheet and gently brush off any loose sugar granules around the edges of the skull pieces and discard any loose sugar that has fallen away.

Tips for making royal icing
I highly recommend a stand mixer, such as a Kitchen Aid, if you have one. Beat the meringue powder, water and confectioners' sugar on low speed until it forms stiff peaks and looks like a paste. It should take about 7-10 minutes.

To assemble your sugar skull pieces, spread royal icing around the edge of one side of the skill and stick the other piece on and press to cement. Allow them to dry for 10-15 minutes before decorating.

In the meantime, turn the remaining white royal icing into several different colors. Separate the white royal icing into a few small bowls and then add just a tiny bit of color by dipping a toothpick into the icing color paste. Mix with a spoon or knife until the colors are completely incorporated. Three cups of royal icing should be enough to cement 8-10 sugar skulls plus make 3-6 small batches of colored icing for decorating.

Once you have your different colors of royal icing mixed, you can spoon into disposable decorating bags. You will need a few couplers and tips to decorate with multiple colors at once. You can start with a tip as small as a No. 1 and work your way up, or also use star shaped tips to make different kinds of decorations. Most craft stores or specialty baking shops will have a variety of tips to choose from.

If you find that after mixing in the colors to your royal icing, the icing is too thick or stiff, you can soften the icing and stretch it a little farther by adding a little extra water at a time or a squeeze of lime juice. The lime juice also gives the frosting a nice smooth glisten.
If desired, pipe the icing to spell out the names of your dearly departed on each sugar skull's forehead. When you've finished decorating your sugar skulls with the royal icing and any other adornments of your choice, allow them to dry undisturbed for a few hours, then add them to your Day of the Dead altar.
A note: There's more than one method to make sugar skulls
If you've ever celebrated Day of the Dead in Mexico, then you know that there's another type of sugar skull that is made with a sugar paste. That method is called alfeñique, and it's a mixture of sugar and water that gets cooked in a copper pot and poured into traditional clay molds. Depending on the size of the mold, they can take up to a week to dry out and be ready for decorating.
How to make sugar skulls for Day of The Dead
- Prep Time: 30
- Total Time: 30 minutes
- Yield: 8 medium-sized sugar skulls 1x
- Cuisine: Mexican
Description
Make your own sugar skulls and decorate with royal icing to adorn your altar for Day of the Dead
Ingredients
- 4 cups sugar
- 2 tablespoons meringue powder
- 2 tablespoons water
For Royal Icing:
- 4 cups of confectioners' sugar (powdered sugar)
- 3 tablespoons meringue powder
- 6 tablespoons water
- For coloring icing: Wilton Icing colors
- juice of 1 lime
Instructions
To make the sugar skulls:
- Mix dry ingredients, then add water and mix until sugar has a crumbly, wet beach sand consistency.
- Fill your skull molds, pressing tightly into the mold.
- Flip the molds onto a flat surface and allow to dry 8 hours or overnight.
- Brush the excess sugar away and then use royal icing to cement the front and backs of the sugar skull together, and colored royal icing to decorate.
To make the royal icing:
- Beat ingredients on low-speed in a stand mixer for 7-10 minutes or until stiff peaks form and the icing looks more like a consistent paste.
- Use about half of the plain white royal icing to cement the front and back of the sugar skulls.
- Divide remaining icing into separate bowls and use a toothpick to transfer icing colors into the royal icing. Incorporate well with a butter knife or small spoon until the color reaches the desired hue and the color is consistent throughout.
- To dilute the icing a bit to make it easier to pipe in disposable decorating bags, use fresh lime juice (squeeze a little at a time and mix well to incorporate). The lime juice will cause the icing to glisten, which is normal.
Notes
These are not supposed to be eaten, as they are for decoration. However, all of the ingredients are edible.
The prep time accounts for how long it takes to make the icing, use icing colors to color the icing to be used for decorating, and to fill the disposable decorating bags. It does not include the time it will take to actually decorate your sugar skulls; time for that can vary greatly depending on the level of detail you would like to decorate your skulls.
It's rather difficult to find those clay molds in the U.S., but plastic molds are readily available even on Amazon. The method you see here is made with a plastic mold I bought years ago on Etsy.
91

Claudia Beck says
I am a teacher and for the past 5 years I use this recipe every year to make "calaveritas" for my kiddos 🙂 Simple, fast, and they turn out adorable! THANK YOU!