• Skip to primary navigation
  • Skip to main content
  • Skip to primary sidebar

The Other Side of the Tortilla logo

  • RECIPES
  • INGREDIENTS
  • ABOUT
  • TRAVEL
  • RESOURCES
menu icon
go to homepage
  • RECIPES
  • INGREDIENTS
  • ABOUT
  • TRAVEL
  • RESOURCES
search icon
Homepage link
  • RECIPES
  • INGREDIENTS
  • ABOUT
  • TRAVEL
  • RESOURCES
×

Mexican Christmas Traditions

How to make frijoles charros

182 · Nov 8, 2010 · 18 Comments

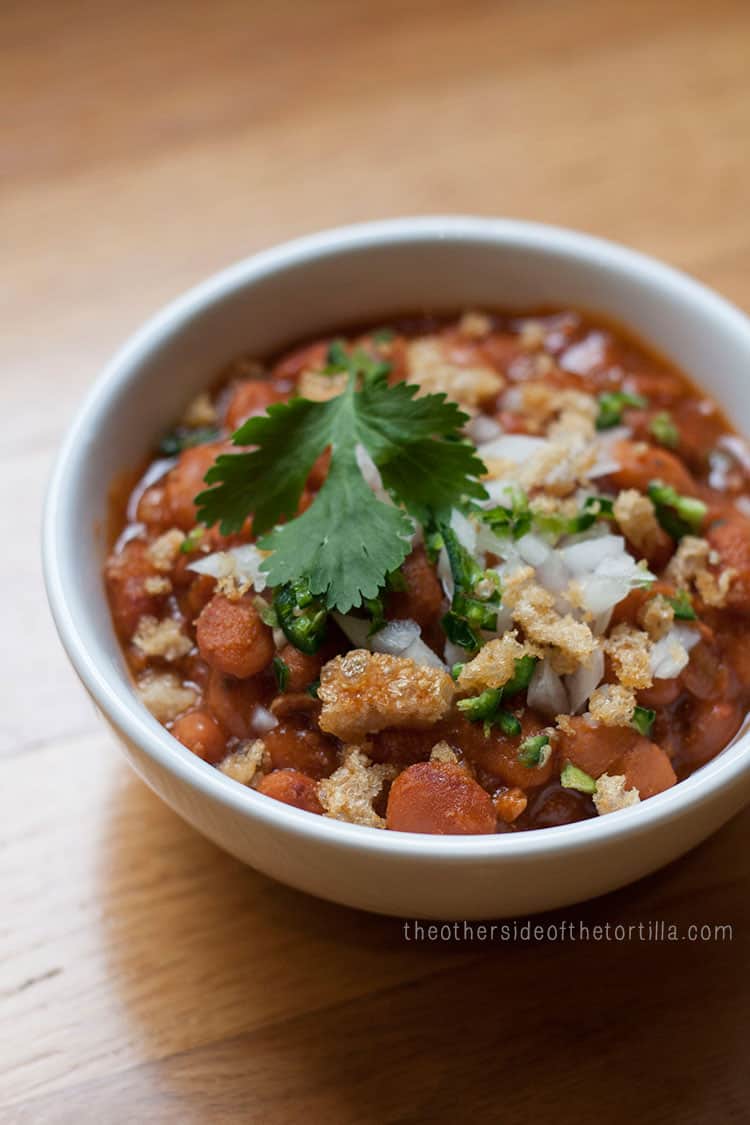
Frijoles charros is one of my all-time favorite Mexican dishes.

For weeks, José had been bugging me to make his Tía Carola’s frijoles charros. Outside of El Charco de Las Ranas, his favorite taquería in Mexico City, Tía Carola’s frijoles charros are the only ones he has ever raved about.

How to make authentic Mexican frijoles charros - recipe via theothersideofthetortilla.com

Until the day I decided to make them.

When I asked for the recipe, it felt like I was playing “teléfono descompuesto” with at least three people – where something surely gets lost every time someone relays the message on to another person. José called his sister, who called his aunt; then his sister called him back and he translated the ingredients to me. Note that he only relayed the ingredient list and not the portions. And he only got a vague set of instructions. Apparently, Tía Carola is not exactly keen on lots of details and also hadn't made this dish in at least 10 years. I'd be lying if I said I wasn't a bit nervous about making this vaunted recipe with such a vague idea of what I was supposed to do.

I returned from the store with a big bag of pinto beans. José argued with me that I had bought the wrong beans because they were supposed to be frijoles bayos. I knew that, but couldn’t find them at the store so I settled confidently on a hand-sifted bag of carefully chosen pinto beans. I settled the argument with a quick google search that ended in my favor, which had me secretly feeling proud on the inside that I knew frijoles pintos and frijoles bayos were not the same, but often interchangeable because of their similarities in taste, color and texture ‑ especially in this recipe.

I knew when José argued with me about the beans that he was going to be a tough customer to please. I lit one of my San Judas Tadeo candles (the patron saint of lost causes and desperate situations) and hoped for a culinary Hail Mary with my limited instructions and the guesswork lying ahead. I was short on time with no room for mistakes since I was making the frijoles charros for lunch on a weekday and all I had as a backup were some emergency TV dinners in the freezer. Who could have ever imagined there could be so much pressure behind a pot of beans?

As I served the frijoles charros, my stomach was in knots. Would they live up to Tía Carola’s recipe? I waited for the verdict as he savored the first spoonful.

Resounding success! “Muy bien!” José said as he nodded and ate another spoonful – as if he had perhaps doubted that I could get the recipe down on the first shot with such vague instructions. I couldn’t blame him. After all, I hadn’t been quite sure I’d be able to pull it off either, to be honest. But three servings and a high-five later, I was convinced I had gotten it perfectly right. I've now been making this dish for years and it's become a staple in my kitchen, especially during the fall and winter months.

frijoles pintos

You need an olla express (a pressure cooker) for this recipe. Like I’ve said many times before to those who’ve asked me, you don’t need to spend a lot of money on a fancy pressure cooker with lots of bells and whistles. I have a pressure cooker that I bought at a national household goods chain for $20 (less a 20% off coupon) that I’ve had for several years and it works perfectly fine. It’s the easiest, quickest way to make just about any kind of beans from scratch. It’s a shortcut even your abuelita would approve of – trust me.

One of the key ingredients in the flavoring of this recipe is Mexican beer, and to help you out in advance, here are a few brands I recommend: Victoria, Indio, Sol, Modelo, Bohemia, and Pacifico. In a pinch, you could also try Tecate or Corona. No matter where you live in the world, you should be able to get at least one of them!

This recipe is perfect as an appetizer, as a meal itself or as a side. It’s especially perfect in the fall and winter because it’s hearty and will keep you warm and full. And José will tell you: it’s even better the second day. That is, if you have any leftovers.

frijoles charros
Print

Frijoles charros

Prep 20 mins

Cook 1 hour

Total 1 hour, 20 mins

Author Maura Wall Hernandez

Yield 6-8 servings

Frijoles charros (cowboy beans) are a hearty, meaty Mexican dish that can be served as a main dish or a side.

Ingredients

  • 1 cup pinto beans (frijoles bayos can be substituted)
  • 5 cups water
  • 2 teaspoons powdered chicken bouillon (such as Knorr Suiza)
  • 5 strips of thick center-cut bacon
  • 4 ounces Mexican chorizo, cooked (I use pork, but you can also use beef)
  • 4 Roma tomatoes (known in Mexico as jitomate Saladet)
  • 4-5 serrano chiles
  • ½ of a large white onion, sliced
  • 1 clove of garlic (optional)
  • 1 cup (8 fluid ounces) Mexican beer
  • 1-2 small sprigs of cilantro
  • salt to taste

For garnish:

  • Finely diced white onion
  • Finely diced serrano chile
  • Crushed chicharrón (called pork cracklings in English)

Instructions

  1. Rinse your beans well and remove any broken pieces. Add the beans and chicken buillon to the pressure cooker and cover with the water. Close the lid and heat on high until the safety valve closes on the pot and the pressure gauge begins to rock gently and consistently (or if your pressure cooker doesn’t have a rocking gauge, follow the directions that came with the pot). Allow the beans to cook for 20-25 minutes.
  2. While the beans are cooking, remove the stems of the tomatoes and roast them under the broiler in the oven with the onion, chiles and optional garlic. Turn them to the other side when you notice them getting darkened. Remove from the broiler and set aside.
  3. On the stovetop, cook the bacon in a frying pan until it is moderately crispy. Remove from the pan and drain on paper towels. Tear the bacon into bite-sized pieces and set aside.
  4. Next, cook the chorizo over medium heat in a frying pan, making sure to break up the meat into small pieces. Be sure not to overcook the chorizo. Drain on paper towels if necessary.
  5. By this time, the beans should be halfway done. Remove the pot from the heat. If desired, you can gently alleviate the pressure by using an oven mitt to set the pressure gauge slightly off-kilter to allow steam to escape until the safety valve unlocks. Caution: it will be very hot and will burn you if you don’t protect yourself with an oven mitt. I like to also use a kitchen towel to catch the steam carefully in addition to wearing the mitt. If you’re not confident about trying this method, don’t worry – just let the pot sit after you’ve removed it from the heat until you hear the safety valve unlock. It will take a little longer that way, but if you’re at all nervous about safety because you’re a first-time pressure cooker user, just let it rest and cool on its own.
  6. Add the roasted tomatoes, chiles, onion and optional garlic into the blender and puree until completely smooth. Add torn bacon and chorizo to the blender and pulse blender until incorporated. The mixture will turn a shade of reddish-orange thanks to the chorizo.
  7. Open the pressure cooker once the safety valve has unlocked. You still should handle the pot carefully – using oven mitts, slowly open the pot facing away from you so any remaining steam escapes safely. There should still be a decent amount of liquid in the pot covering the beans. If not, add a little water until the beans are completely covered.
  8. Add the mixture from the blender to the pot and then the beer; stir once, throw the small sprig of cilantro on top and close the pot back up securely. Put it back on medium-high heat until the pressure gauge rocks gently and consistently again (it should not spin or spit liquid; if it does, the heat is too high). Reduce the heat just slightly and cook for another 25-30 minutes.
  9. Remove from heat and allow to cool using the same method as before. Once you open the pot, the beans are ready to be served; just add salt to taste.
  10. Garnish with finely diced white onion, serrano chile, crushed chicharrón and if desired, a few fresh cilantro leaves.

Notes

The cook time for this recipe is based on using a pressure cooker.

Cuisine Mexican


Cilantro for frijoles charros - recipe via theothersideofthetortilla.com


Spotted in Chicago: Hojas de Maguey

50 · Nov 7, 2010 · 1 Comment

Just when I’m missing Mexico and checking my calendar to see how many days are left until I leave for my holiday trip next month, I find something amazing and unexpected in the grocery store that makes me feel relieved that a little piece of Mexico is never too far away. Thanks to the fact that there are more than 1.5 million Mexicans in Chicago, and therefore no shortage of Mexican grocers, I can often find foods or other Mexican things I’m missing within a 10 or 15-minute drive from our apartment.

These leaves, called hojas or pencas de maguey, from the maguey plant (also known as agave) are often used as an envoltorio, or wrapper, to cook barbacoa. Seeing them at the grocery store this week reminded me of a recent trip to Querétaro with my suegros, while we were en route from Mexico City to Aguascalientes to celebrate José’s abuelita’s 90th birthday.

More on that trip (and barbacoa) later this coming week – I just couldn’t resist sharing the highlight of my day!


¡Feliz Día de los Muertos!

55 · Nov 2, 2010 · 12 Comments

la ofrenda

Today is Día de los Muertos, a day to celebrate the lives of our deceased loved ones. It is believed that on this day, the souls of the dead can travel back to earth to be with us. Leaving an altar with an offering for the souls ensures that they will find their way home.

I thought I'd share with you the altar that we made in honor of our family members who have passed away.

The altar includes flowers, religious candles, fruit, tequila, lime and salt, obleas con cajeta, water, dulce de guayaba cristalizada, a miniature tortilla press and molcajete, dolls my Dad brought me from a trip to Mexico when I was a little girl, pan de muerto, a pillow, colorful striped fabric, papel picado brought all the way from Mexico City and a handmade carpeta de encaje (ornamental lace). Confession: I ate the pepitorias that I made for the altar last night before I got the chance to photograph it, I just couldn't resist.

I was interested in how others around the world constructed their altars and what they looked like so I curated a project you'll see below. I asked friends, family and strangers on Facebook and Twitter to submit photos of their altars to share here on The Tortilla. I'll continue to add items to the curated project over the next few days as I continue to receive more photos.

Here are a few more details from our altar in honor of José's grandparents, my grandparents, and other family members who have passed away, including my uncle who was killed in an accident earlier this year. May their souls rest in peace.

tequila, limón y sal
pan de muerto

View the entire album of our altar by clicking on the thumbnails:

Thank you to everyone who allowed me to share their photos for this curated project. I spent the last few days searching and collecting items posted on Twitter that contributed to it. I hope you enjoy looking at all the photos as much as I did.

Last but not least, muchas felicidades to Marcela from Culture Mami, who won our apron giveaway from last week! I look forward to seeing photos of you wearing your calavera-print apron made by Lisa Renata. 🙂

  • How are you celebrating Día de los Muertos? Who are you honoring with your ofrenda?

How to make pepitorias

24 · Oct 30, 2010 · 5 Comments

pepitorias

In the days of the Aztecs, Día de Los Muertos was a festival celebrated the entire ninth month of the Aztec calendar, but when the Spaniards arrived in the New World and attempted to convert the indigenous people to Catholicism, the holiday was moved to a single day to coincide with the Catholic All Souls’ Day on November 2.

The Spaniards disliked the indigenous traditions and may have labeled them as barbaric and pagan, but Día de Los Muertos is not as scary – or sad ­– of a holiday as some think. This holiday actually has very sentimental roots. It’s all about celebrating life and honoring the dead.

In some places in Mexico there are parades, people decorate the gravesites of their deceased loved ones and construct altars in their homes with offerings, called ofrendas, for the souls of the dearly departed. Altars often include items like photographs of the deceased, items they may have owned, foods and beverages they may have liked, flowers and even sometimes a pillow and blankets for the souls to rest after their long journey.

Día de Los Muertos is one of the most beautiful and unique holidays in Mexican culture because everyone, young and old, shows their love and respect for the family members and friends that have passed away over the years. Celebrating their lives is also a reminder to the living to cherish their time on earth.

One of my favorite things to do in Mexico City is go to the tianguis, or open-air market. Part of the reason I love them so much is because they’re a vibrant reminder of what it means to truly be alive. I love everything about it: the arts and crafts for sale; the tinkling strains of melodies being played by street musicians; the food stalls with everything from jamoncillo (milk fudge) and dulce de calabaza cristalizada (dried candied pumpkin) to tacos de canasta (tacos in a basket).

pepitorias

On my first visit to the Bazar Sábado in Mexico City’s San Angel neighborhood several years ago I was delighted by all the makeshift stalls selling artisan crafts and every kind of sugary homemade treat I could imagine. Many of the stall owners off the Plaza Jacinto were offering generous samples to entice potential customers to buy a medio-kilo of this or a medio-kilo of that. One of the things that caught my eye at several of the stalls, though, was a hanging treat bag with brightly colored half-moon wafers that had pepitas sticking out of them and some kind of sticky miel holding them together. I was entranced.

“They’re pepitorias,” my suegra told me. She handed the stall owner a few coins with a smile and gently pulled a bag down from the clip from which it was hanging. As I took my first bite, it was both sweet and salty and I was definitely in love. Suddenly, I noticed the vibrant-colored obleas everywhere I went and I seem to have developed an internal radar for finding them ever since.

Earlier this year, I discovered one of my favorite Mexican grocers began carrying obleas in three different sizes and all the colors of the rainbow so of course I bought a package of each size. As candies and other treats are often given as ofrendas for Día de Los Muertos, I’ll be including pepitorias on my altar this year.

obleas

RECETA

PEPITORIAS

  • 1 package of Obleas de harina de trigo (colored wheat wafers)
  • Pepitas or pumpkin seeds
  • Melaza (unsulfured molasses)

METHOD

pepitas y semillas de calabaza

Fold the wafer in half so that you have two half moons. They may crack completely and that’s just fine. It’s okay if they don’t crack evenly or if you have a few jagged edges.

Using your finger, the back of a very small spoon or a miniature pastry brush, dip your chosen tool into the molasses and lightly spread along the inner edge of one side of the wafer. I prefer to use my finger to feel the molasses and avoid using too much. If you use too much, your pepitorias will be drippy with molasses and will bleed through the wafer, making them very sticky. The key is to use just enough molasses so the seeds will stick but not so much that the seeds are able to shift easily. Once you’ve finished, place the pepitas or pumpkin seeds onto the molasses so they are stuck to the wafer and protruding halfway out.

Gently spread molasses on the inner edge of the other half of the wafer as well as a little in the center so the two pieces of wafer will stick together. Align the wafers so the molasses strip on the second half of the wafer fits snugly against the seeds and press gently in the middle to make sure the wafers are stuck together.

Sorteo Tuesday - Día de Los Muertos {GIVEAWAY}

13 · Oct 26, 2010 ·

día de los muertos apron

Happy Sorteo Tuesday! Why is it happy? Because sorteo means giveaway en Español!

Día de Los Muertos is coming up next week and I’ve been cooking up a storm to get ready! You can expect to see a recipe posted later this week to help you prepare for the holiday.

If you’re not familiar with Día de Los Muertos, check out SpanglishBaby each day this week for new and interesting posts – they’ve got a whole category on the subject to educate yourself along with fun ideas on how to celebrate with your escuincles (a funny slang term for ‘kids’ that José’s abuelita Ana likes to use). You can read more about the holiday here on Friday alongside a special recipe post, so don’t forget to come back or subscribe via email to get recipes and stories delivered directly to your inbox so you don't miss it!

I'm a big fan of all things Día de Los Muertos and when I found this fabric with miniature sugar skulls on it, I knew I had to have it. At the cooking demo I did in Miami making albóndigas, I wore a special apron made of this very fabric that my friend Lisa made for me for an extra serving of buena suerte. She was kind enough to ship the apron to me at the hotel I was staying at so that I’d receive it in time to wear for my demo, and it was a huge hit with the audience – in fact, the apron got almost as many compliments as the albóndigas!

AND I’VE GOT ANOTHER APRON JUST LIKE MINE TO GIVE AWAY TO ONE LUCKY TORTILLA READER!

los detalles: the ruffled trim and the pleated pocket

...

Read More

  • « Go to Previous Page
  • Page 1
  • Interim pages omitted …
  • Page 74
  • Page 75
  • Page 76
  • Page 77
  • Page 78
  • Interim pages omitted …
  • Page 83
  • Go to Next Page »

Primary Sidebar

¡Bienvenidos!


Hi, I'm Maura Hernández, an award-winning food and travel writer, recipe developer, and former journalist sharing my passion for all things Mexico. I've traveled Mexico extensively over the last 18 years and Mexico City is my home away from home. Here, you'll find a mix of traditional and modern Mexican cooking, along with my advice on where to eat, stay and play on your visit to Mexico!

More about me

Paletas

  • Berries and cream popsicles are a mixed-berry spin on the traditional Mexican fresas con crema dessert. Recipe via theothersideofthetortilla.com
    Moras con Crema Popsicles
  • How to make strawberry hibiscus popsicles via theothersideofthetortilla.com
    Strawberry hibiscus popsicles
  • Mangonada popsicles displayed on a cookie sheet
    Mangonada popsicles
  • How to make banana, chia and coconut milk popsicles. This recipe is dairy-free and vegan-friendly! Via theothersideofthetortilla.com
    Banana chia popsicles
  • Mango cantaloupe and chile powder paletas from The Other Side of The Tortilla
    Mango cantaloupe paletas with chile powder
  • #Vegan fudge #popsicles made with avocado, raw cacao powder, coconut sugar and coconut milk. Get more #recipes from theothersideofthetortilla.com #paletas #receta #recipe
    Vegan avocado fudge pops

Footer

↑ back to top

About

  • Privacy Policy
  • Disclaimer

Contact

  • Contact Me
  • Media Kit
  • FAQ

As an Amazon Associate, I earn from qualifying purchases.

Copyright © The Other Side of The Tortilla, 2009-2024