


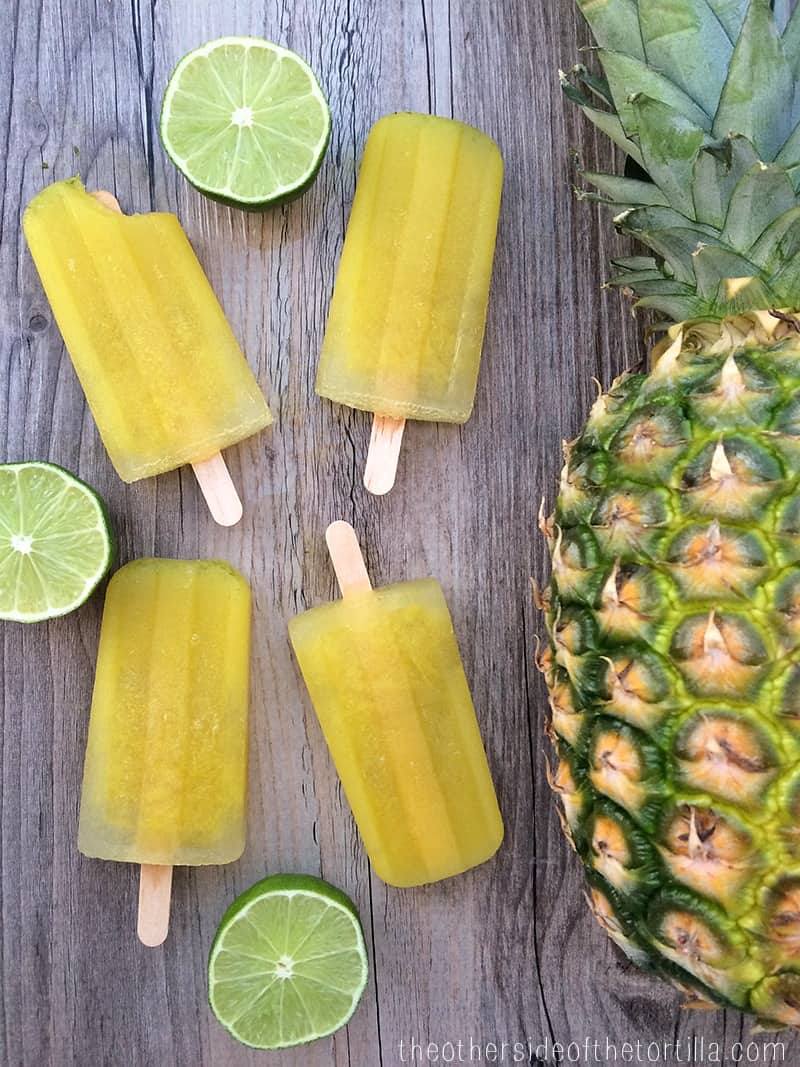
Paletas made with pineapple, cucumber and lime juice are a refreshing, healthy treat you can enjoy without any guilt! This all-natural, no sugar added popsicle recipe is one of my favorite ways to cool off from the summer heat, without consuming lots of empty calories or sugar. The lime zest gives these paletas a bright zip of color and a citrusy aroma that lime juice alone just can't provide. I also love how the lime zest sinks to the bottom of the popsicle mold as it freezes, embedded in the pineapple juice and some of the cucumber juice naturally floats to the top of the mold. It makes for a pretty layered look with zero effort for it to turn out that way!
After going 10 days without eating sugar last month, I began thinking a lot about how much added sugar we actually consume in our household. Although we won't completely cut all added sugar out of our diet, there are definitely some places we can easily cut back to make healthier choices. And although it's true that pineapple has a moderately high amount of natural sugar, the juice, when cut by cucumber and lime juice and divided into 10 popsicles, still has way less sugar per serving than almost any store-bought popsicle, and absolutely no preservatives, chemicals, sugar substitutes or artificial color dyes.
RELATED RECIPE: Mango cantaloupe paletas with chile powder
If your family consumes a lot of popsicles in the summer like mine does, then you probably already know that making your own ice pops can be both cost effective and healthier. Especially if you've got little kids you don't want eating lots of sugar, this recipe is a great, tasty option. Be sure to cut the skin off the cucumber so that the flavor is mild and blends in well to mellow the sweetness of the pineapple. Leaving the skin on the cucumber often results in a bitter flavor that throws off the balance.
This pineapple, cucumber and lime popsicle recipe is vegan-friendly, dairy-free and gluten-free.
I really recommend that you use a juicer for this recipe rather than a blender in order to extract the maximum amount of juice with the least amount of effort, and so you don't water down the flavor. (A juicer is a great investment for your household if you or your kids like fruit or vegetable juices, or if your family consumes a lot of aguas frescas like we do.) If you don't have a juicer and need to use a blender, you'll need to add a little bit of water (a quarter cup to start, and more if needed so your blender doesn't burn out the motor) to blend with the pineapple and cucumber. Then, squeeze the pulp through either a fine mesh sieve or a nut milk bag to filter the juice, and add the lime zest and juice at the end.
RELATED RECIPE: Watermelon and Tajín paletas

Pineapple, cucumber and lime juice make a refreshing, no sugar added popsicle treat!
*A juicer is needed for this recipe.
Ingredients
- 2 cups pineapple juice (takes about 2 pounds of fresh pineapple, juiced; it may take more pineapple if you are not using a juicer)
- 1 English cucumber (seedless), peeled and juiced
- Zest of 1 lime
- Juice of ½ a lime
Instructions
- Remove the peel from cucumber and roughly chop the pineapple. Put the cucumber and pineapple through a juicer.
- Using a microplane grater, zest one lime into the pineapple and cucumber juice.
- Cut the lime in half and squeeze one half into the juice. Stir well to mix.
- Pour into popsicle molds and freeze for 6-8 hours or overnight.
Notes
*A juicer is needed for this recipe.
Prep time does not include time in the freezer.
Store-bought pineapple juice often has added sugar and preservatives. For that reason, I recommend that you juice fresh pineapple. One pound of pineapple equals about 1 cup of juice, so choose a pineapple that's at least two pounds.


gloria says
Sounds delish. Do you need pineapple juice or pineapple itself? It says to chop the pineapple but in the ingredients it calls for pineapple juice. Sounds great.
Maura Wall Hernandez says
Gloria, thanks for your question. I went back and revised the ingredient list to clarify that you do need to juice fresh pineapple to get the juice. Store-bought pineapple juice often has added sugar and preservatives. In general, about 1 pound of pineapple equals 1 cup of juice. So in order to get enough juice, choose a pineapple that's at least 2 pounds. I often buy pineapples at Costco because they're around $2.50-3.50 for one pineapple depending on where you live, whereas in my regular neighborhood market, pineapples are sold by the pound.
Azu says
Love the combination of ingredients for this popsicles! I totally agree that homemade ice pops are way more healthier, they are made with fresh ingredients, even if they contain sugar naturally, they are so much better than added chemicals.